

Aquila Kytori
-
Posts
1,212 -
Joined
-
Last visited
Content Type
Forums
Blogs
Knowledge Base
Everything posted by Aquila Kytori
-
Hi Chic I usually use the Linden viewer but just for you I tried with a Firestom viewer. Not sure how old it is , says August 2016 .. even gives a warning that Physics isn't going to work with mesh uploads............ but when I rezzed the building and changed to Prim, the collisions surfaces seemed to be working just fine. The Physics mesh I used was not Analyzed.

-

Physics upload issue! Please help before I lose my mind
Aquila Kytori replied to Lexii Lane's topic in Mesh
Hi I came across a rotating Tardis on one of the Aditi sand boxes today The probable reason you are having problems getting the physics to work properly is that the model is made up of 10 different mesh obects. When making a physics mesh there are a couple of rules that have to be complied with. 1: Each visual mesh object has to have its own physics mesh object. If you are uploading all 10 parts together but with only 1 physics object then …. the result is something like you are experiencing. 2: The bounding box size of the physics mesh must be the same as the bounding box of the visual mesh. As Arton has already said, if the Physics mesh’s bounding box is different from the visual mesh’s bb then it will be stretched or squished to fit. Which will result in collision surfaces not aligned to the visual mesh. Unless you have good reason not to I would suggest that you join up all the parts of the visual mesh in 3D Max so that they are all one object. Then make a Physics mesh for that single object. If you need a part to be separate, for example for animating, then upload it separately with its own Physics shape. Doing this will almost guarantee having correct collision surfaces. Note: In the example below the physics mesh is designed Not to be Analyzed in the mesh uploader. The reason the vertice count is higher than Chic or Rey approve of is not because your model is too detailed or dense but because you have a lot or edge loops that would not be there if you had modeled the side panels as separate, (but part of the same object) unconnected to the rest of the structure. For comparison, the model in the image above is very similar to yours but the panels are separated from the rest, the vertice count in Blender is around 1450 and 3500 in the SL mesh Uploader. (Sharp edges, UV islands and 6materials etc).
-
What is the best amount of samples in Cycles?
Aquila Kytori replied to IIianII's topic in Building and Texturing Forum
@Chic Aeon A lttle off topic but have you seen the demos of Eevee ? Real time rendering coming to Blender with 2.8, -
........waiting for Bitsy..........

-
*Fix Found* Dreaded error on upload, no solutions worked for me
Aquila Kytori replied to Zazaaji's topic in Mesh
And the fix was ? -
The name of the addon is right there in the screenshot that you posted https://blendermarket.com/products/uv-squares/
-
......... and if Bitsy doesn't come in to claim the kittens in the next 24hours they're mine ! Actually I think its best i take them into my post now ........ for safe keeping. We don't want anybody to think that they have just been abandoned.......I have seen people walking around SL in jackest made from kitten fur .

-
Hi

-
Perhaps this thread was what you were thinking of or this one Drongles posts not mine ........ You didn't make it very clear exactly what your problem was Chic ! Anyways if it was about editing normals in Blender there was some good news anounced this week. Blender is having another go at getting editing normals more user freindly sponcered by your frieind Google https://summerofcode.withgoogle.com/projects/?sp-page=2#5878855406452736
-
annother OOOOOOOps, I jumped in without really looking carefully at the screenshots. The fence could well be made from alot of different mesh Objects.
-
I’m with Pamela on this on. Its LOD’s. When you are close to an object you can see all of its detail. Lots of vertices and triangles need to be calculated and rendered on your screen. When the object is farther away you cannot see so much detail so it would be a waste of processing power to still have to calculate the positions or all those triangles. What many game engines do, including Second Life is to use different mesh models depending on their distance from the viewer. A High detail model when viewed up close. Switching to a Medium detailed model when viewed a little farther away. A Low poly model when it is still farther away. A Lowest poly mesh when it is so far away you can’t make out hardly any details at all. These meshes of different complexity are called LOD’s. Level of Detail. The distance at which one LOD mesh switches to another is dependant on its size. (and the value you have the RenderVolumeLODFactor set at in the viewer that you are using). A large mesh model like a house will switch LOD’s at a greater distance than say a flower vase. A mesh object in Second Life really is a collection of 5 different mesh models. High LOD mesh. Medium LOD mesh. Low LOD mesh. Lowest LOD mesh. Physics mesh. You have created your Fence mesh and saved it as Fence.dae. This is the High LOD mesh. And you have your Cube.dae to use as your Physics mesh. That’s only 2 meshes! Oh I forgot to mention the most important thing ……. The complexity of the lower LOD meshes has a huge effect on the final LI cost of the object. For room size objects it will be the Medium LOD mesh that has most effect. For a flower vase size object it will be the Lowest LOD mesh that has most effect on LI . For your Fence its probably the Low LoD that effects the final LI cost the most. The more complex your Low LoD mesh is the higher will be the LI . The fewer Vertices/triangles used in that Low Lod mesh the lower will be the cost. So what about the other 3 LOD meshes? If you are only loading up your Fence.dae and Cube.dae then hitting the Calculate weights and fees button, then it is the Uploader that is creating these other 3 lower LOD meshes for you. These are Automatically Generated for you. See first screenshot below : If you look more closely you can manually change the complexity of those Auto Generate lower LOD meshes and set the vertice and triangle count to a lower number. In the second screenshot I have set all three Generate lower LODs to there minimum values. Notice in the Preview window that the Medium LOD mesh now appears as a single Triangle. The LI count is now only 1.6 . This is certainly a big difference from the first screenshot but if I were to upload like this when I zoom out all I will see of my beautiful mesh is a single triangle ! This is what Chinrey calls Butchering the LOD's OK low LI but not very good to look at from any distance other than close up. Instead of using Auto Generated lower LOD’s a much better solution is to create them yourself and and use these in the lower LOD slots of the Uploader. But when just starting out most people don’t, they play with the auto generate values The Auto generated LOD’s can never be as good as the ones you make yourself. The auto generator just cannot know what details are important to keep and which can be removed for each level of detail. One thing you need to remember when creating your own LOD meshes is that each LOD mesh must have the same list of material faces. As you gain experience you will get the feel for which LOD level is going to have the most impact on LI and also how much detail you need in each LOD model.


-
Hi I only got as far as making static mesh objects so perhaps I have completely misunderstood what you are asking ……. but I was curious…. When I select the UpperBodyMesh from the Avatar Workbench and copy it (Ctrl + C) then open a new Blender file and paste it into there (Ctrl + V), it gets pasted in along with its Modifier, Vertex Groups and Shape Keys etc. Maybe you mean something different ? Also you didn’t say what method you are using to Export and Import your rigged clothing item into the second Blender file?

-
Hi The ‘Hitbox’ is usually called the Collision or Physics mesh. To have correct collision surfaces for your model you need to do 2 things : 1: Tell the mesh uploader where you want to have the collision surfaces. 2: When your model is rezzed inworld, set the Physics Shape type to Prim. You can tell the mesh Uploader to use your High Lod model for Physics. This may be Ok sometimes but usually this will cause the final LI cost to be higher than necessary. Best is to create a simplified model and use that for Physics. To do that, in your 3D modeling programme, make a copy of your Landscape Object and simplify it as much as possible. Only have geometry where you need to have collision surfaces. Then save it as a separate .dae file. (Landscape_Phys.dae) The fewer triangles/quads you use in this model the lower will be the Physics cost. One rule you have to follow is that the Bounding box dimensions (X, Y and Z) of your physics model must be the same as the Bounding box dimensions of your visual (High LOD model). Upload your Landscape.dae model as usual and then open the Physics tab of the mesh Uploader. In Step 1 of the Physics tab upload the Landscape_Phys.dae file. Don’t touch any of the other options in the Physics tab ! Hit the Calculate button then Upload. Rezz your model on the ground then Edit it. Open the Features tab and change the Physics Shape Type from Convex Hull to Prim. Now it should be walkable


-
Hi You may or may not know that there is a Second Life Beta grid, which you can use to do test uploads. On this Beta test grid the uploads costs are FREE ! Read carefully through this page :http://wiki.secondlife.com/wiki/Preview_Grid To have access to this little test world you will need to open your SL viewer and enable Show Grid Selection at Login Then at the Login screen choose Second Life beta Test grid (Aditi) and Morris as your destination. (there are other sandboxes on the test grid if you need them. When you get there just open the main map and do a search for sandbox) Note, for uploading mesh you will need to redo the "Mesh IP Test" etc. You will still be "charged" an Upload fee exactly the same as when you are on the main SL grid (Agni) but the L$'s will not be deducted from your main account.


-
In my garden i put a "script less"digital sundial
Aquila Kytori replied to Earl Dinkin's topic in Mesh
Nice I have downloaded the files and will try one out at the weekend. Have you tried adjusting the rotation a little to get the correct time as shown in the Mojoptix video at approx 9:05 ? -
Next time you are in a store with an amazing reflecting floor take a sneek peek below the surface ...........

-
Intellectual Property Rights
Aquila Kytori replied to GongYoo's topic in Building and Texturing Forum
Not today you can't. Ask the same question in a few years time and the answer may well be yes. The Disney copyright on Mickey Mouse is due to expire in 2023 http://artlawjournal.com/mickey-mouse-keeps-changing-copyright-law/ -
Making Skins For Dummies 101
Aquila Kytori replied to Khyujo's topic in Building and Texturing Forum
Hi Unfortunately the wonderfull Eloh Eliot skin files are becoming harder and harder to find. But not impossible. You can still download some from here: http://www.outworldz.com/download/ Scroll down the page and you will find them: Avatar UV templates can be found here: http://www.robinwood.com/Catalog/Technical/SL-Tuts/SLPages/AVUVTemplates.html and why not some fake bake textures : https://marketplace.secondlife.com/p/Fake-Bake-Shaded-Avatar-TGAs-Tutorial/140146 The above should keep you occupied for a few days ........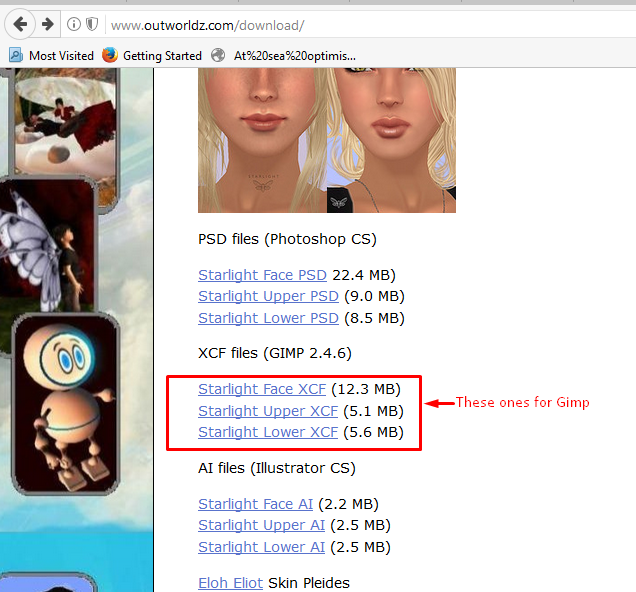
-
Intellectual Property Rights
Aquila Kytori replied to GongYoo's topic in Building and Texturing Forum
Just want to add to what Klytyna said: you are allowed to copy "that dress" but you are not allowed to use the Trade makerd logo or copy righted image on it. Same goes for vehicles that are in or have been in general production . You can copy that sports car but you can't use the Ford logo on it or call it a Mustang Mach 1. On the other hand you are not allowed to bring in a copy of a concept car unless it is of your own design. You may find this video interesting : -
You need to look more closely Drongle *https://content.invisioncic.com/Mseclife/image_extract/169928iDFFA72B9FE0F80EC.jpg It seems the older the post the more chance images will still be intact. I expect its just a matter of time untill they sort out a similar system as before where images can be uploaded directly from hardrive. I hope there will be the option to search through pages of past images that had been used in ealier threads. I found that very usefull in the old forums to find older posts again that I wanted to link to. Just to note: looking through some of my previous posts I found an error in one where the image that was being used in my post was not the image I had originally used. Not one of my images at all If someone is missing "pink shoes" image from their post let me know and I will tell you where you can find it A spell checker would be nice ..............
-
By default Blender uses “Blender units” 1 blender unit = a meter. Most, a lot, some people, (but not Chic) set units to Metric in Blender : 1 meter in Blender = exactly 1 meter in Second Life. There is one thing you should be are aware of,. Scaling, Rotating and or moving a mesh in Object mode is not the same as scaling etc in Edit mode. If you have to Scale in Object mode you should Apply those functions before UV unwrapping etc and or exporting to Collada ( .dae ) format for uploading to SL. Before uploading its best to have Scale = 1 and Rotation = 0 in all 3 axis. In the example below, in Object mode, I scaled the default cube ( 2 x 2 x 2 meters) along the X axis by 1.25, then change to Edit mode. Notice how the length of the edges along the X still indicate 2 meters. To show the correct length: return to Object mode and Apply the Scale: Now in Edit mode the correct length is indicated: As a general rule Add your starting mesh Primitive in Object mode and do all the rest of the mesh work in Edit mode. You may find the Mesureit addon usefull:
-
Blender how do i select an object(i.e leg) of an object
Aquila Kytori replied to ZozaTech's topic in Mesh
You are going to have to start at the beginning. :smileywink: -
Blender how do I get rid of this red and white circle?
Aquila Kytori replied to ZozaTech's topic in Mesh
Why are you blaming that red and white circle thing for not being able to "move or rotate anything" ? http://blendersushi.blogspot.fr/2011/07/ui-that-pesky-3d-cursor.html -
Hans Rosling died this morning...
Aquila Kytori replied to Celestiall Nightfire's topic in General Discussion Forum
........... and thankyou Hans Rosling. -
Not sure ifthis is going to be of any help to you or not but the following explains how to import and join all the parts into a single Object in blender: Blender > File > Import > select the stage1.dae With everything selected ( A key toggles select everything or nothing) : Ctrl + A > Apply Rotation and Scale Still with everythinbg selected : Ctrl + J will join all the parts into a single Object. Next you can delete that camara thing: Now that all the parts are joined to be a single mesh Object it has 9 materials. You really don't want to be uploading mesh objects with more than 8 materials otherwise bad things will happen: I know its easy for me to suggest that you move to Blener but if you can do this and put up with the pain, after a few weeks you will realise how much more Blender has to offer when it comes to creating low poly models for use in SL.


 Facebook
 Instagram
 Twitter
 YouTube
 Flickr