Jump to content

Tips and Tricks

  • entries
    45
  • comments
    559
  • views
    159,502

Contributors to this blog

About this blog

Entries in this blog

Garry Linden

Hi Everybody! 

I would like to introduce a new member of the Linden Support team, Boxy 5000. 

Boxy 5000 is a virtual assistant/support bot trainee. 

But wait, wasn’t there already a chatbot who answered questions for premium users? Indeed there was! Boxy 3000 was the earlier model of the trainee chatbot. 

We are learning from some design flaws and moving forward with a more advanced bot. Boxy 3000 has been re-invented and given an extra 2000! 

But wait a second time! Won’t this bring about the machine apocalypse? Not just yet–Boxy 5000 is more advanced and learns as they go but Skynet is still a few upgrades away. 

The upgraded bot will be a 24/7 support option for both premium and non-premium residents! (Previously only available for premium customers.)

Boxy will have the ability to answer commonly asked questions, keep you up to date on current issues, help with ticket submission and in some cases handle a support request. 

Boxy has uses for all residents, from early adopters to fresh new faces. 

For new and more casual residents Boxy is available to help them find the support they need. 

For our seasoned veterans Boxy can offer support options for some specific requests. Specifically, Boxy will be able to submit an abuse report on your behalf and in some cases help with the restart of a region!

Boxy will continue to learn as we go. Boxy might not have all the answers currently, but we will continue to review questions posed and help the bot to better answer your support queries. 


We realize that a chat bot is not a substitute for a customer support representative, and this bot is not meant to be. It is however meant to help when we are unavailable or may be experiencing higher call volumes. 

For premium residents Boxy will only be the first point of contact before being passed to a support representative during office hours. Utilize Boxy to help better explain your issue once you are transferred to a support representative. Outside of office hours Boxy can help or create a ticket for when we are back in the office.

The ability to get an answer to your question or to get your issue resolved without having to wait until our Support Lindens are available is Boxy’s primary directive.

Anyone interested in saying hello to Boxy can access it by logging into our support portal. The Boxy 5000 chat widget should appear in the bottom right hand corner of your screen.  

Boxy 5000.jpg

Boxy 5000, it’s advanced… 

Linden Lab


Hello Residents of Second Life!  

Over the last few days, Residents using certain email providers may have noticed that they are not receiving all email notifications for events such as Marketplace purchases and Offline Messages.  

Email has come a long way since it was first introduced to the world in the 1960s. There are many factors that affect the deliver-ability of a message, and algorithms which affect it are constantly being updated.  Sometimes things go awry despite best intentions - such as certain phrases being flagged as indicative of spam, or the volume of messages sent in a certain time frame.

Second Life is a complex beast and not all our email sending practices are as good as they could be. We are re-examining these practices and we’re going to do better to make sure our Residents are able to get the information they need.

There are some things you, as the recipient, can also do to better ensure deliver-ability, such as having email filters, white-listing certain contacts, checking your spam folder and marking legitimate messages “Not Spam,” and even contacting your email providers about certain emails.

If you are experiencing issues receiving emails from us, you may also want to consider updating your email temporarily to a different provider (for example if @yahoo emails are failing, try a @gmail account), verifying your email address with us (offline IMs, friendship offers, auctions, etc all require a verified address), and white-listing (add sender to contacts) Second Life messages to ensure you receive them in the future. It’s always best to use an email account that is only accessible by you.  

We sincerely apologize for the inconvenience caused and will provide updates once available.

Governance Linden

Hey everyone,


It’s recently come to our attention that there has been an increase in the use of third party tools that gives account credentials and control over a Resident’s account to another Resident. This and similar products can change an account password and/or details, such as email address, which could prevent an owner from accessing an account, or even from being able to recover the account.


We want to remind everyone that giving another Resident access to your account or account information, by any means and for any reason, is both dangerous and not permitted by the Terms of Service. An account is intended to be used solely by its creator, and keeping your account details secret and secure helps you keep it that way.


We’d like to provide you with some quick tips on how to keep your account secure:


Choose a secure password with upper- and lowercase letters, numbers, spaces, and symbols, and avoid common dictionary words or phrases. For instance, “password” is not a good password, but “wh4tAr g@t4P55!” is much better (though you shouldn’t use that last one either, now that all of Second Life just read it, too).


Choose a secret security question answer. To keep your information extra secure, choose an answer that you will remember, but that no one else could possibly guess. For example, answering “What is your favorite vacation spot?” with “Potsdam, Pennsylvania” isn’t secure if you have that listed as an interest on your social media accounts. Answering “The Wide Wide World of Sports” might be much more secure!


Keep your password and the answer to your security question secret from everyone, regardless of their relationship to you. Only you should know this information; not your significant other, family member, casual acquaintance, person with an honest look in their eye, or anyone else.


Keep your password unique and special to Second Life. Reusing the same password across different platforms or websites makes your account vulnerable if one of those sites suffer a data breach.


No Linden will ever ask for your password. Likewise, there is never a reason for you to enter your password to unlock an item, receive a discount, or anything else.


Use only the official Second Life Viewer, or a Third Party Viewer from the Third Party Viewer Directory. If the viewer does not allow you to log directly into your account for any reason, the viewer is NOT secure.


You can read more about keeping your information secure on the wiki at Linden Lab Official: Password Protection


If you have any problems accessing your account—especially if you believe that your password or security information may be known to anyone other than you—please contact the support team by opening a support case.


Thanks for keeping your account secure!

-Governance Linden

Linden Lab

Residents are experts when it comes to using the tools within Second Life to create amazing work. We love it when someone decides to share their knowledge in an easy and intuitive way - and hope to share even more helpful community tutorials here in the near future.

You may have seen this lighting tutorial from Resident and creator Brookston Holiday recently, but if you haven't - we encourage you to have a look. If you're a builder, designer, or even a casual photographer in world, the tips shared here are simple, low resource ways to create dramatic effects using lights and projectors inworld. 

Torley Linden

I, Torley Linden, am not currently blogging because my work focuses have shifted elsewhere... but you can get in touch with me on my profile page!

--

In the Advanced mode of the Second Life Viewer, subtle-yet-powerful new Preferences get added — and overlooked — leaving them less used than they could be, which makes me sad unless I do something about it. I love to champion this stuff because I know how much enjoyment it can add to your Second Life.

One bit I'd like to call out is the ability to double-click and teleport just about anywhere you see. I'm voracious about sightseeing in Second Life, and that means not having to put up with walls when I want to get somewhere. Fast. Why put up with hassle when you can 'port in the blink of an eye?'

You can turn it on in just a few clicks:

  1. Select Me menu > Preferences.
  2. In the PREFERENCES window, click Move & View tab.
  3. Check Double-Click to and click either Teleport or Auto-pilot (which makes you walk somewhere instead of teleport).
  4. Click OK.

This video shows how it looks in action:

I've heard from many fans of this feature from Third-Party Viewers, so I'm glad it's come to the SL Viewer.

Oh, and if you prefer to use Basic mode, this combined functionality is already on: single-click auto-pilots, double-click teleports! The difference is a small dot to indicate your destination. Which makes me curious: if you prefer Advanced mode, do you want this feature on by default? (Click to discuss in the forums.)


Torley Linden

Not long ago, I was going to eat sushi with friends. (I'm so fond of sushi I named a cat after it.) But before I did, I took many pictures of the impending feast. One of my chums asked me why, and I candidly replied:

"This meal will be gone soon, but the memories will remain."

So it is with inworld photography, one of the most popular hobbies inside Second Life — and getting started is as easy as clicking a single button. Years ago, I started a snapshot help page that has since helped thousands of Residents discover the joy of SL photography firsthand. As time passed though, I received hundreds of requests to update the guide to reflect the newest Viewer versions. I have!

Curious and short on time? Aren't we all. This less-than-three (not to be confused with "<3", although I love teaching this stuff) minute video gets you started:

What's next?

Happy snapping and see you 'round community.secondlife.com and in Second Life!
Torley Linden

Spring is in full swing, and that goes hand-in-hand with spring cleaning — which includes your Second Life inventory! Wait, what's that? You dread opening up those dusty folders with hundreds, even thousands of items that you've never used. I bet that rings a bell.

Have no fear. While the psychological burden may initially seem like a mountain, taking small steps is the key. Cleaning your inventory isn't exciting compared to hanging out with friends in cool places, but each of these tips only takes minutes, and when combined, will help you feel sooo much better after decluttering! Plus, did you know a smaller inventory loads faster and uses less resources? It's not the same as going green in the physical world, but it helps. Let's get started with this video tutorial, then I've got written tips that expand on what I show, along with direct links to those sections of the video:

Get Your Total Item Count

For fun (or abject horror), start typing something — anything — in the Filter Inventory field. Your item count will rise above, until it's done loading. You can compare this to what it is when you're all done.

Don't be hard on yourself, though: this count includes Library items which you can hide, since they're not actually yours.

Make a "Temporary" Folder for Sorting

Right-click the My Inventory folder and select New Folder. Name this folder "Temp", or if you want it to stand out, something loud like "~*~ TEMP ~*~". Drag items that you're not sure of into here, so you can sort them out. This prevents them from clogging up casual folder browsing.

You can extend this concept more specifically. For example, create a "Temp" folder in each main folder like Objects.

Sort the "Temp" Folder

Here's a basic process that I've refined over time:

  1. Put on some mood music to get you in the zone. (I usually bliss out to ambient, but there was that one time I rocked out to 
    in an aggro loop... yes, there's an emo Torley... sort of.)
  2. Teleport to a clean surface, like a white skybox or a public sandbox. I have a flat platform which is set to Full Bright (neutral lighting), and makes it easiest to see what I'm placing.
  3. Drag and drop objects from your "Temp" folder inworld, so they rez and you can see what they really are. This is useful if you have a lot of generically- or identically-named stuff (like lots of objects named "Object"). "No copy" objects are removed from your inventory after being rezzed, so take them back from inworld if you want to keep them. Otherwise, you can delete the inworld instance.
  4. Move objects you want to keep to another folder. You may have an existing sorting scheme. I have "Archive" folders for objects dated by month, because I often have memories attached to objects of how I got 'em.

Depending on the land, you should either clean up after yourself or let auto-return take care of it. In the latter case, multiple objects returned to your inventory simultaneously appear in your Lost And Found folder as coalesced objects. Like the Trash, you can easily and permanently delete its contents by right-clicking it and selecting Empty Lost And Found.

Continue Onto Other Item Types

Objects are just one inventory item type; you surely have clothing, notecards, textures, and so on. For each item type, I like to go through them as a batch. These tricks make it easier:

  • For animations, gestures, notecards, scripts, sounds, and textures (including those in your Photo Album): hold Shift key while clicking to select a range of items, or hold Ctrl while clicking various un-adjacent items in a list, then right-click and select Open to open all those items in a single window. This makes it easier to browse each item and decide if you really want to keep it.
  • For clothes and other wearables, it can be a good idea to have a minimal, "neutral" avatar so you can easily see what's added upon wearing. While an ideal one isn't provided off the bat, I suggest making a nude/underwear outfit of your fave avatar. This also accurately reflects your bodily proportions, which matters because just like the physical world, wearables look awful at the wrong size.
  • If you want to save a texture to your local hard drive but no longer need it in your inventory: double-click the texture and click the Save As button, which saves it as a TGA file which can be opened or converted by an image editor like FastStone Viewer. (This only works if the texture is fully-permissive, like in-Viewer pics you take that end up in the Photo Album.)

Eliminate Useless Redundancy by Deleting Duplicates

You don't need more than a single copy of an item in your inventory if it's copyable, so after you've checked goods out, select dupes and hit that Delete key. But before you do, be aware:

Items with the same name aren't necessarily the same. For example, if you work on an object inworld and take it back into your inventory, it keeps the same name. This is confusing if you also keep older versions of it. You can click the little gear icon at the bottom and choose Sort by Most Recent. Also, learn from many great content creators: append a version/revision number to the item name. I sometimes type the date in the name as a self-reminder.

Landmarks are one of the most notorious types of dupes. Here's why: many, many stores give a landmark in each product box. While this is initially useful to find your way back if you want to buy more, as shown in the video, the WORLD MAP dropdown shows landmarks from every folder in your inventory — and isn't smart enough to hide dupes. If you don't use that dropdown, this doesn't matter to you, but otherwise, you can filter (search) your inventory for those dupes by name, then delete them.

Furthermore, I don't keep many landmarks: since any landmark can be converted to a standard web link known as a SLurl, I save SLurls on the web instead, like in my Flickr exploration albums which have the advantage of loading quicker and giving me higher-resolution visuals.

Delete original boxes — MAYBE. There are two schools of thought: some Residents prefer to keep original boxes of copyable items because they're a backup if things go awry, while other Resis feel secure not having them around, after expanding the contents into a folder. My recommendation? It really does depend on the specific items. Boxes for non-copyable objects can probably be tossed away because they're just empty shells — unless you like the box design itself. Also, a growing number of merchants offer automated delivery if you lose something, so take that into consideration.

Ye Olde Art of Cube-Stuffing

If you've spent any amount of time with veteran Residents, you may have caught wind of "cube-stuffing" lore. Cube-stuffing is exactly what it sounds like: archiving a bunch of items in a cube and lowering your inventory item count. This works because object contents aren't tallied up in the total. You can cube-stuff items you want to backup and preserve items you seldom use, yet don't want to throw away.

  1. Right-click and select Build on a parcel of land you have build permissions on. The build tools open.
  2. Click the parcel to rez a cube.
  3. In the build tools window, click the Content tab.
  4. Drag inventory items you want to archive into the Contents folder pane. (Advanced usage: You can drag items directly onto the cube itself, but there's a subtle exception: Dragging a texture onto a prim applies it to a prim's face, unless you hold the Ctrl key while doing so.)
  5. Once you've stuffed the cube, click the General tab to give it a meaningful name and date so you remember what's inside later.

Limitations:

  • While there's not a strict upper limit for how much you stuff in a cube, note that loading the item list can be extremely slow once you get into the hundreds of items. Also, there are no sub-folders: dragging nested folders breaks their hierarchy, so cube-stuffing isn't that useful for original outfits.
  • Unfortunately, you can't search the contents of an object as you can with your inventory.
  • Some Residents keep stuffed cubes out on land where it won't be autoreturned, so they have backups in case of inventory loss — since the cube isn't in your inventory, it won't be affected. However, it will be affected by land changes, so be sure if you're going to do this, rez the cube somewhere stable.

This information is provided so you're aware of the possibilities. I don't really cube-stuff anymore and have grown more forgiving of letting my inventory count (it's at 13,362 right now) grow over the years, with the tradeoff that I'm more aggressive about deleting clutter. In first life, there was an insightful Lifehacker post on this titled "Rethink Your Stuff: What to Splurge On, What to Toss". While we avatars don't need beds and our shoes aren't going to wear out, sentimental stories attached to an object still matter to many of us!

Remember to Empty the Trash!

It's garbage day! After all the above, right-click your Trash "folder" and select Empty Trash. Then check your total item count and congratulate yourself — your future self will say thank-you too, when they find something you couldn't. ;)

Explore Resident-Created Inventory Organizers

While the above has mainly focused on trimming your existing inventory, this is closely related to ongoing organization. Searching the Second Life Marketplace yields dozens of "inventory organizer" matches that are designed to overcome system limitations, and further automate the above steps. For example, texture organizers can make it easier to browse through visual previews instead of muddling around in folders.

In case you're wondering, I don't currently use a specialized inventory organizer, but am discovering many cool tools as I rebuild Torley island.

Further Learnin'

You can see general inventory management tips in our Knowledge Base — note some of that info is stale and I haven't gotten to updating the videos.

Have an inventory-cleaning tip that leaves you feeling like sunshine? Let us know in the comments!


Torley Linden

The Second Life Viewer can be pretty resource-intensive, but there are ways to help it cooperate better with other things happening on your computer. You can easily increase or decrease the amount of CPU power the Viewer uses when it's in the background — for example, if you're surfing in an external web browser, or editing images in Photoshop. In other words, anytime the Viewer doesn't have focus. This video shows you exactly how:

  1. Select World menu > Show > Advanced Menu. (Veteran Residents will remember this used to be more obscure!)
  2. The Advanced menu appears next to the Help menu. Select Advanced > Show Debug Settings.
  3. Type in "BackgroundYieldTime". It autocompletes. The default is "40" milliseconds, a reasonable balance.
  4. To make the Viewer lighter in the background, increase BackgroundYieldTime to "200" and click on the desktop (or another app where you can still see the Viewer). You should see the Viewer update less frequently — animations will be choppier. For the inverse effect, decrease this to "1". The Viewer should still run smoothly when it's in the background.

Why might you want to increase the power the Viewer uses in the background? If you're on a powerful computer with multiple cores, you can run multiple Viewers easier. If you're making machinima, you could film two Viewers simultaneously (since one would always be in the background) with less of a framerate drop.

So depending on your specific needs, you can adjust this whenever you want. Experiment and see what works best for you! The Task Manager (Windows) or Activity Monitor (Mac) can show you CPU usage.

Have Second Life performance tips? Share 'em in da commentz.

Torley Linden

I hope you've been finding community.secondlife.com's search to be a great improvement over the previous system. In my own raw usage of digging stuff up, I've found the autocomplete (also called "auto-suggest") to be a lovely friction-reducer in finding answers fast. As you get more comfortable with search, here are handy things to know:

The search box is on almost every page

Ain't that convenient? Just about everywhere you go on community.secondlife.com, you'll see the familiar search box in the upper-right.

The search box is on almost every page.png

One notable exception is directly under the Answers tab, because here, a simple search is contained within the "Ask a Question" widget to reduce confusion. But when viewing a particular Answers thread, your private messages, and more — there's the search box!

You can make search results more useful

Community participation — YES, YOU — helps good things float to the top. How?

For example, if you ask a question in Answers and get a helpful answer, make sure to mark it with Accept as Solution. This highlights it so others who have the same question after you can see it easier. It should also rise up in search results.

Also, if you're generally browsing Answers and see a helpful answer, click the Kudos button, available in certain places. It's an easy way to thank the answer-giver and help others focus on what's useful. Kudos are part of our ranking system, which makes it easier to see who extremely helpful Residents are.

You can make search results more useful.png

(If you're wondering: "I didn't notice that before!" you'd be right, because we didn't have Kudos when we initially launched community.secondlife.com. But it was added last week.)

For more on where you can give Kudos — or revoking them if you made a mistake — see this Community Help page.

Various Lindens, including myself, are also watching for threads that our Residents deem especially worthwhile. In rare cases when a thread is so broadly useful that IT MUST BE SEEN BY EVERYONE (OMG!), we can also float (sticky) a thread to the top of a forum, like this:

Floated-stickied threads.png

For your own personal view (that doesn't affect anyone else), you can choose Topic Options > Float this Topic to the Top when viewing a thread, making it easier to find on future visits:

Float this Topic to the Top.png

Search for a specific Resident

Are you looking for someone's profile? Here's how:

  1. In the search box's dropdown menu, select Users.
  2. Enter their name (or your closest guess) and wait for it to autocomplete, or click Search.

Search for a specific Resident.png

Note: There's a weird bug. If you go back a page after viewing results and do another search, it may incorrectly show "0 matches". I've reported it.

Bookmark power search if you use it often

Starting your search with the simple mode should work fine for most, but if you regularly find yourself narrowing down options, you can bookmark the power search page. If you want to keep track of search results over time because there are keywords you're watching for — like a type of land you want to buy — then you can Subscribe to RSS Feed for this Search, too.

If you're accustomed to Boolean operators and want even more options, click the Advanced Search... link to get super-granular. As we say here, the world's your prim oyster. ;)

Advanced Search... + Subscribe to RSS Feed for this Search.png

What does that "Highlight" thing do in the Forums?

When clicking Options in the upper-right of a forum post, this appears:

Highlight post.png

I asked community guru Lexie Linden and she clued me in: turns out it's the same as it's similar to "Permalink", which puts a specific URL for that post in your browser's address bar, which can be useful within a huge thread.

UPDATE: As Cerise Sorbet clarifies in the comments: "The highlight function should literally highlight posts in a different background color, but the graphical backgrounds used here have been covering up the effect." Oh boy, we need to fix that!

Of course, the name is confusing — I was expecting the post to glow or something. So I've made a request to rename Highlight to Permalink like we already use elsewhere on the site, like at the bottom of a blog comment.

Use Google to search all of secondlife.com

What if you want to search not just community.secondlife.com, but all of secondlife.com? Or a specific subdomain? Google offers a popular workaround:

If you find yourself doing this frequently, you could create a Google Custom Search to save time. As those 80s NES days used to say: NOW YOU'RE PLAYING WITH POWER!

For more info on how to search community.secondlife.com, see Community Help - Searching.

Got a compelling search tip you wanna share? Let's hear it!

Torley Linden

Friendly greetings!

I'm delighted to see you, now that community.secondlife.com is live for your vibrant participation. (The old blogs.secondlife.com addy still works, and redirects.)

If you're new to this site or even Second Life, check out "Welcome to the New Second Life Community Platform", and remember that Community Help is accessible from many pages.

A bit about myself: I'm Torley Linden, and have loved being an intense part of Second Life since 2004. I believe that creative expression through your avatar is a self-empowering and healing benefit. Here's who I am today, yes I'm meditating:

5492234878_3af1ebdb9e_o.jpeg

Ever since I started, I've had a passion for learning useful + fun facts and sharing them broadly so Residents of all experience levels can benefit: I observe that many "power user" tips are only perceived that way because they're obscure and not well-understood, and by making knowledge more accessible, you'll have a better experience. After all, how many times do you find yourself going: "I wish I knew that earlier!" That's one of the most popular things I hear. So I found myself constantly promoting these tips & tricks — hence YOU ARE HERE! :)

It's been wonderful seeing you "early adopters" jump onboard community.secondlife.com and not only play with a variety of things, but also ask questions. For starters, if you've been perusing the My Settings area (there are a lot more options than the previous community platform), you may have wondered:

What are macros?

Simply put, macros let you easily copy-and-paste frequently-used blocks of text. It could be a catchphrase, a collection of useful links you often refer to... think of what you need most. So without further ado, here's a video to prepare you on how to use macros:

Another thing I should call out... if you want to make richly-formatted macros but aren't comfortable with HTML coding:

  1. Enter the macro you want to see in a Rich Text field. (You can easily get to one by starting a question in Answers, but remember not to submit it through if you're just testing!)
  2. Click the HTML tab to see the code.
  3. Copy that code into the macro field on the Macros page.
  4. Scroll to the bottom of the Macros page and click Save Changes.

I have a video that shows you exactly how to do this, too:

But remember: styling should support effective communication, not distract from it.

Related

And since we're still ultra-new-and-shiny, we've been hot out of the gate fixing various bugs. I'm aware we could use some more breathing space between headers, and bulleted/numbered lists aren't indented correctly. A gracious thank-you to those of you who helped me reproduce some of those bugs yesterday: quick fixes for image uploads, weirdly-spaced emoticons and more have already been done by our Community Platform gurus. Feel free to share your future findings in the Community Feedback forums!

Is there an aspect of community.secondlife.com you're curious about? Chat with me in the comments!


Torley Linden

Hot question answered up ahead!

Some of you have been wondering how to switch your forum — and in general, discussion — view to threaded view, which is commonly used on other systems so you can track branched conversations. It's easy!

  1. When logged in, click My Settings.
  2. Click the Preferences tab.
  3. Click the Display tab underneath that.
  4. Select Show all posts in a topic.
  5. Scroll down and Save Changes.

This video shows you precisely how:

Like I mentioned in the video, I recommend having a web browser with two tabs open, so you can easily flip between making changes and seeing what effect they have. Many are self-explanatory but some require experimentation and giving yourself time to get used to changes. Learning by doing will help you grow more confident with community.secondlife.com!

Our Community Platform team is busy scouring your early feedback and responding, so stay tuned for more need-to-know tidbits.

What other hot tips about using our community platform would you like to see?

Torley Linden

As a Second Life Resident, you have a profile that you can customize to share more about yourself. It's opt-in and can be a lot of fun to fill out. Why bother? Many fellow Residents surf profiles, and if you're open to making new friends, a completed profile makes you a much more fascinating person to get in touch with.

As you may know from Q Linden's post announcing Viewer 2.5, this new version of Second Life has profiles stored on the web. The following video chock full o' tips will help you learn what's changed as Linden Lab continues to evolve how you express your virtual identity.


If you want text instructions and more info,

Check out the "Web profile" wiki help page

Feel free to edit and update it to make it awesomer! Remember, we're moving to a new community platform so this may get ported over as-requested.

Also, you know how much I love followup and to set expectations so you understand what our intentions and plans are at Linden Lab. I'm constantly asking our company gurus for goodies I can share with you. After all, I live and breathe SL; the same stuff that bothers you bothers me too. I've read some comments to the tune of,

"Is that it for web profiles?"

No! Since this is only the first instance of web profiles, there's usability stuff in a sort of "in-between" state that Linden Lab hopes to improve in the future. For example:

  • Web profiles tend to load slower than old-style sidebar profiles, so there's room for performance increases.
  • Some stuff hasn't been migrated to the web profile yet — like you can't edit a classified in the web profile yet, so the behavior of hopping back and forth is confusing. But plans are hatching for better integration.
  • Having both a web profile and the sidebar open at the same time takes a lot of screen space, and that could be tightened up too.

And the odd moments of quirkiness shown in the video. Again, I emphasize: this is just the beginning. Stay tuned for improvements, but right here, right now (like

), the above tips should help you get the most out of web profiles today.

On a misc. fashion note,

"Where did you get your eyeshadow, Torley?"

Some of you have also asked this, as featured in my recent videos! I had been looking all over Second Life for eyeshadow in my fave pink + green colors, and this is "Fruity Fresh" by Miasnow Myriam. It can be bought on Twomoons Island:

http://farm6.static.flickr.com/5164/5350322120_ac876ee9b1_z.jpg

Check out the Destination Guide for more rad Second Life places and send your suggestions to our Editorial Team (which I'm on)!

...

Finally — for now, the ending of one chapter and the beginning of the next — this is my last blog post on this Jive system before moving to the new community platform.

I'm giving a gracious thankyou to each and all of you lovely Residents who've benefited from these Tips & Tricks, and hope you'll join me in TnT's next incarnation. (I also need to figure out how I'm going to preserve and promote the still-useful archives.) See ya on the flipside after the read-only freeze!  

In the meantime, stay awesome in Second Life and I look forward to meeting you in-avatar...

Torley Linden

Bustin' a move on the virtual dancefloor and losing control is all fun and games — until you try to stop and yet your avatar just keeps on doing the electric boogaloo. When you find yourself in such a socially awkward situation:

  1. Go to Me menu > Movement > Stop Animating Me


FREEZE. This applies to all animations, not just dances: if you teleport and find yourself magically-yet-uncomfortably sitting in midair, that's another opportune time to use Stop Animating Me. (Although I see that less than I used to, let me know what your experiences have been.)

Context:

  • Normally, you can click a Stop button in an animation window or command an inworld object (like a dance ball) to cease. If all else fails, you have Stop Animating Me.
  • This feature has moved various places over time, but in 2.4, Linden Lab decided it was useful enough to bring out from the confines of the Advanced menu, so here you are.

Then, get back to intentionally dancing.

http://farm4.static.flickr.com/3260/2605776593_e88f874216_z.jpg

Torley Linden

Whether you're in a corporate environment or have a few computers connected at home, your network likely includes firewalls, which prevent security intrusions and other kinds of unauthorized access. If you're trying to connect to Second Life behind firewalls that are too restrictive, you may be blocked unless you open ports and otherwise allow the necesary traffic through. If this has happened to you and you don't know which ports to configure, check out:

Configuring your firewall to allow access to Second Life

Obligatory disclaimer: don't "play" SL at work unless it's on company business (like me, hah!).

Thanks to Kyle Linden who recently provided me with updated details. Speaking of, I should also emphasize: over time, firewall details change, so if you've used the guide to connect successfully, you'll surely want to bookmark it if something breaks in the future.

Please let us know your feedback in the comments!

Torley Linden

What gadgets can I use to control Second Life?

At a minimum, you need a keyboard and mouse to use Second Life. But they're not the only options.

While it's largely uncharted territory, some experimenting with other input devices — or even maximizing what you already have — can yield great results. In other words, taking an hour to customize your controls can save you many more hours down the road.

(Even more adventurous in our history, see The Rig and Hands Free 3D.)

For example, most mice (including popular Microsoft and Logitech models) already have drivers that let you map extra buttons to keyboard shortcuts. Some builders I know mapped side buttons to Link (Ctrl-L) and Unlink (Ctrl-Shift-L) so they can quickly modify sets of prims when building. For awhile, I mapped a side button to Ctrl-Shift-S for taking a snapshot — until I figured out something even better (more on that in a bit).

We'll check out more gadgets later in this post.

What's the next step up from keyboard shortcuts?

Macros! With a macro, you can execute a whole sequence of keystrokes from a single keyboard shortcut. And in turn, you can make a single mouse click trigger that macro. There are various macro programs out there; on the Windows side I like PhraseExpress, but I recommend checking out Lifehacker for lots of info you can precisely apply to Second Life.

http://farm3.static.flickr.com/2513/3881460763_0d96d7bafe_z.jpg

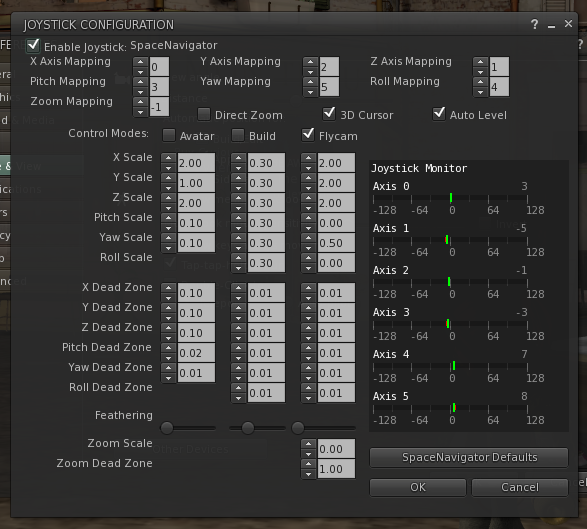
Ever feel like the keyboard and mouse are too stiff to see what's going on? While it isn't the most publicized thing, many machinimatographers (moviemakers) and other fans of smooth motion are fond of the SpaceNavigator (learn more about usage), which has been marketed as a "mouse alternative" and makes it easier to zoom through scenes because it was built with 3D in mind. While it's been awhile since Linden Lab declared official partnering with 3Dconnexion (makers of SpaceNavigator), the setup still works the same way on Windows & Mac (not Linux) in the latest Viewer (2.4 as of this writing) and what you need to do is:

  1. Install the SpaceNavigator drivers.
  2. Plug the SN into a free USB port.
  3. Start the Second Life Viewer and login (it's easier to test when you're inworld).
  4. Go to Me menu > Preferences.
  5. In the PREFERENCES window, click the Move & View tab.
  6. Click the Other Devices button.

It should recognize the SpaceNavigator by name here. The default settings work fairly well and all the fields may look scary, but here's an example setup which is good for capturing inworld sporting events. Notice it disables Pitch Scale (0.00) so you don't get flip-flopped upside down when tracking motion:

http://farm6.static.flickr.com/5286/5263836936_1b22fa2bea_o.png

An odd thing about the specific SpaceNavigator model that I have is that it's gone up in price over time. This is because the "cheaper" ones some of us got ages ago were a "PE" model: functionally the same hardware-wise but lacking the same level of tech support — something to consider if you use the SN with other apps. Typically, you can find the "SE" model for under US$100 on Amazon and other places, although if you hunt around on eBay, you may be able to score one closer to US$50, which is what the old price was.

The SpaceNavigator isn't the only USB input device compatible with SL: I've heard from Residents using XBOX 360 controllers and other gamepads and joysticks. None of these have been certified to work for sure, so before you go exploring, I recommend doing research for pre-existing experiences and buying from somewhere with a good return policy.

What other input options are worth considering?

Not long ago, I acquired a Scythe USB Foot Switch to solve a problem: taking photos and videos when my hands are busy with the keyboard and mouse! Now, all I have to do to grab some footage is STOMP! It's a lot of fun, the Foot Switch seems to be built pretty well.

usb-footswitch-3-large.jpeg

Mine is the 3-pedal model and looks somewhat like a guitar stomp box. I got it for about US$44 from Newegg; cheaper 1-pedal and 2-pedal versions also exist. The setup software is really crude but you can map it to most keys on your keyboard. One drawback is that I could only find Windows-compatible software, although interestingly enough, it retains the keys in memory so you might be able to set it up on a Windows machine (or Boot Camp install), then plug it into a Mac. I'm unsure of Linux compatibility.

In my specific (read: geeky) setup, I've been using the F-keys at the top of my keyboard as PhraseExpress triggers. That way, I can have the Foot Switch setup so:

  1. The left pedal is mapped to F11 - Starts/stops movie capture in FRAPS.
  2. The middle pedal is mapped to F10 - Triggers PhraseExpress macro to (1) take a snapshot to disk (good ol' Ctrl-`), (2) hide the UI and take another snapshot to disk, and (3) send a postcard. Whew! I did this because postcards are flaky and I wanted to have an easy copy of the hi-fi original.
  3. The right pedal is mapped to F12 - Takes a picture in FRAPS.

Note that the F-keys themselves are pretty much arbitrary and I've configured this simply as I feel comfortable. I'm still exploring the possibilities and these are very specific needs, but specific needs are often the most timesaving for one's particular workflow. And you can always adapt these principles to your own processes.

Can you remap Second Life's keys?

Yes, you can. It's not the most user-friendly but it's not brain surgery, either. What you need to do is open a text file and change some lines. I previously wrote the "Keyboard mapping" help page to show you how.

Have a question or a tip about using input devices with Second Life? Ask/answer away in the comments!

Torley Linden

Hey, wouldn't it be nice if you could directly login to a friend's pad or hangout spot? Guess what? We've got that in Viewer 2.5 Beta! There are a couple preferences boxes you need to check, and I've got you covered from start to finish, so download the 2.5 Beta and watch this video to see exactly how to make this work for you:


Here's da lowdown from Q Linden:

Logging In to your Favorite Locations
A  long-standing feature request has been the ability to access some of   your favorite Landmarks from the login screen, so you can quickly  teleport to places inworld. In the Viewer 2.5 Beta, we've added a  preference that gives you access to the Landmarks on your Favorites Bar  from the Login Screen. To use this feature, go to Preferences >  Privacy and select the check box labeled, "Show my Favorite Landmarks at  Login." If you log off and then restart your Viewer, then you'll see a  list of your Favorite Landmarks in the "Start At" drop-down box on the  login screen. Also, when this feature is enabled and you share a  computer account (login) with other people, they will see your list of  Favorites if they run the Viewer 2.5 Beta.

Subtle tips:

  • This works on an account-specific basis. Changing the Username at the login screen shows that account's favorite locations, if you have Show my Favorite Landmarks at Login enabled.
  • The Start at dropdown shows your fave landmarks in the same order they appear on the inworld Favorites Bar — drag 'em around to sort.
  • Alternatively, if you trigger a SLurl to launch the Viewer, it can also log you in to another place. The more you know, right?

Do you ever feel like you're collecting frequent teleporter miles?   Share your favorite SL travel tips in the comments!

Torley Linden

Ever been in an awkward situation where you wanted to wear several accessories at once, only to find that they all used the same attachment point? And wearing one detached another? ARGHHHH... WAIT! Before doing the old-skool "attach to a different point and manually reposition", you should definitely know that in Second Life Viewer 2.4, we've formally introduced MULTIPLE ATTACHMENTS TO THE SAME POINT. (The eagle-eyed among you know it's been in testing for longer.)

Heck yes.

What this means is you can "stack" objects on any attachment point, as long as the total # of attachments your avatar is wearing is 38 or less. This video shows you a very practical situation many of you lady avatars can relate to: how to deal with when jewelry tries to attach to the same slot as your dress.


Gotta be glam for your big night out, yeah? Special thanks to Nyx Linden, a master of multi-wearables, for confirming facts!

For more details,

check out the "multiple attachments" help page

See something missing? I encourage you to fill in more useful info! Like inworld content, Second Life help is Resident-powered, and I'm here to inspire you to discover your power of self-expression.

Torley Linden

Awhile ago when we changed from the older-style "First and last name" at registration to "Single-word username" system as part of display names improvements, single-username Residents could view, but couldn't post to the forums and blogs here at blogs.secondlife.com.

After much tussling, we've fixed it as shown here, so go ahead and make your voice heard! I know it was terribly frustrating from the many messages I got. Our apologies it took so long, seeing as how important it is that you can ask for help from your fellow  Residents in Second Life Answers... and I'm guessing you have a lot to say. Single-username logins also work at the Bug Tracker.

Related, single-username logins to the Second Life Wiki still don't work, meaning newer Residents can view, but can't edit the wiki help pages. We're still working on this and if it seems like we've gone strangely silent on giving updates, just ping me and I'll check with our tech experts to see what's going on. I promise.

Torley Linden

What's a HUD?

In Second Life, objects can be worn on one of the eight HUD (short for heads-up display) attachment points. HUDs are essential to understand, since every SL Resident eventually comes across them sooner or later.

A HUD typically consists of a control panel with different buttons you can click on to do context-specific stuff. Some HUDs are "passive" and only meant to be looked at, not touched.

While general attachments appear on your avatar's body and other Residents can see them, HUDs are only visible to you and have a fixed viewpoint, similar to how they're used in video games and apps. However, the scripted effects of a HUD, like emitted chat, can be visible to other Residents and objects.

HUDs are an evolution of user interaction in SL: before HUDs, Residents were limited to typing commands in chat or touch dialogs (pop-up windows with choices to click on). These methods are still used — sometimes in tandem with HUDs — but HUDs are often more visually attractive and user-friendly, making them approachable.

Objects specifically designed to be used like that may have "HUD" in their name to tell you where they'll appear, or they may have "(wear me)" in their name.

This video quickly gets you started on the basics:

;


Yes, HUDs are mighty fine for games in Second Life too. Wanna learn more?

Check out our guide to HUDs

... and share your fave HUDs and tips & tricks for all things HUD-related in the comments!

Torley Linden
  • Hey, are you having problems with the Second Life camera cutting into low ceilings and walls?
  • Or maybe it's too close to your avatar and you want more breathing room?
  • Perhaps you're filming a movie and want more cinematic vantage points.
  • Maybe you'd like to increase your field of view so your peripheral vision can see when a Linden is going to hit you with a concussive round of snowballs!

Yes, that's right, in time for the LINDENS VS. RESIDENTS SNOWBALL FIGHTS taking place today (Dec. 16, 2010) and tomorrow (where? when?), contrary to my self-preservation's best interests, this video shows you how to you can fine-tune your camera offset angles so you can truly get a better, personalized view of your world as you walk and fly around.


You can download Viewer 2.4 Beta and there's also general info about Advanced menu.

Special thanks to Skate Foss for giving me Guu Nishii's chill bazooka, and Paulette Parx and the Stepford team — they aim for realistic proportions with their suburban living:

http://farm6.static.flickr.com/5170/5264178398_a954c4a7ba_z.jpg

MOAR PIX HERE.

Want to go even further?

Scripted camera gadgets allow you to automate camera angle changes. Two of my faves are Penny Patton's Camera Control HUD (free!), which gives you an over-the-shoulder, "video game-like" perspective, and Rian Jayaram's Dvandva Region Snap (L$100), which lets you get birds-eye pictures of a region like this one of Stepford, BEHOLD!

http://farm6.static.flickr.com/5246/5247402536_27dd9135bb_z.jpg

You'll never see our virtual world the same way again.

What are your fave camera tips?

Torley Linden

Ohai, I wanted to let you know we just moved the Second Life Wiki — where a variety of "help me learn SL!" pages are stored — to a new server host (Amazon EC2). What does mean for you? The changes are under-the-hood, so while you won't see drastic visual differences, you should notice better performance and reliability. We also upgraded to a newer version of MediaWiki, bringing the security improvements and bug fixes that come with that. All this also means that every time I share a link to a wiki help page in a tip or on the forums, you should be able to get there faster, and browse to subsequent pages quicker — it all adds up.

However, on the geeky side of things, there are a few known issues you may want to be aware of (thanks Rand Linden!). Should you notice any more, please add them to the known issues discussion page so our wiki-inclined Lindens can have a look.

Keep spreading the knowledge!

Torley Linden

Running multiple Viewers has become more accessible thanks to an easy checkbox in Viewer 2.4 Beta.

If you run multiple Viewers (what are the official Viewers?) — for example, you prefer building in 1.23 but want 2.3's communication enhancements, and are also testing the Mesh project viewer — certain aspects can conflict, especially if you're running them at the same time.

For example, each Viewer refers to a cache folder which stores info about inventory, textures, sounds, and other previously-accessed data for quicker retrieval. Having a bunch of Viewers using the same cache folder is like a game of Hungry Hungry Hippos™* — they clash for resources OM NOM NOM and oddities like perceived inventory loss (never fun) and corrupt textures (that sucks too) may result.

However, you can change your cache location for each Viewer.

  1. On the Viewer's login screen, choose Me menu > Preferences. (In Viewer 1.23, it's Edit menu > Preferences.)
  2. In the PREFERENCES window, click Setup tab. (In Viewer 1.23, it's Network tab.)
  3. Click the Browse button. (In Viewer 1.23, it's the Set button.)
  4. Use the file browser to choose a different folder, or create a new one. Then choose it.
  5. Quit the Viewer (as changes won't happen until you restart it), then repeat the above for each Viewer.

PREFERENCES - Setup tab - Browse button to change cache location.png

Thanks to cheery Sylvan Mole of our Linden Department of Public Works for suggesting this tip!

What tips do you have for using multiple Viewers?

* The hippo analogy is even more funny when you realize hippos are SL's unofficial mascot.

Torley Linden

In the epic tradition of me promising to followup when wishes come true...

With the Viewer 2.4 Beta comes with the exciting, long-awaited GRADUATION of several "advanced" features to SUPPORTED* status, as denoted by their inclusion in the PREFERENCES window (instead of being buried obscurely under-the-hood).


You may know a lot of my video tutorials feature the Advanced menu, which, despite its name, has features that are useful for even beginner Residents once you get your hands on them. However, it can be tricky for some to get the right keystroke combination down, so we've added a checkbox!

Be sure to download the beta first.

  1. Select Me menu > Preferences.
  2. Click Advanced tab.
  3. Check Show Advanced menu.

And ooh, what else do we have here? A checkbox to Allow Multiple Viewer, another thing that's been on the hotlist for... <BRIAN BLESSED Blessed>ETERNITY!!!!</BRIAN BLESSED> My venerable-yet-creaky instructions may soon vanish, replaced by what is a deservedly simpler method. To make this work, still in the Advanced tab of the PREFERENCES window:

  1. Check Allow Multiple Viewer and click OK. (It seems a restart isn't required but let me know if you find different.)
  2. On Windows, double-click your existing Second Life Beta Viewer shortcut (it's probably on your desktop). On Mac, right-click the app package and select Duplicate, then double-click the copied app. (I don't know what the Linux process is, please deplete my ignorance.)

Another Viewer should spring to life with no "Second Life is already running" error so you can have a party with your alts without worrying whether you put one or two dashes in front of the flag (old joke).

Also be sure to see Jack Linden's Viewer 2.4 Beta blog post for what else is

.

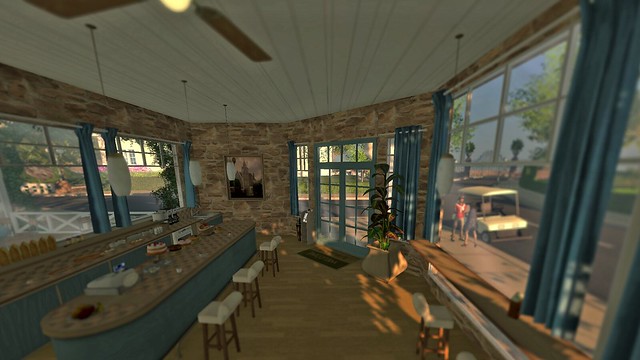
And hey, on a tangent, if your computer supports it, have you played with DEPTH OF FIELD? Mighty fine inspiration coinciding with the snow, lemme tell ya... the first few are post-processed, but I find DOF makes it so much easier to achieve "lofi" and "analogue" camera looks.

Hearth Pose (edit)Seasoned Spirit (edit)Play That Funky Music Avatar (edit)Looking Nostalgic (edit)Not Evil Ball (edit)Bloooom (edit)effected with Toycamera Analogcolorcornell box revisited - Torley LindenMISSING MILE - Torley Lindeni want it like old film - Torley LindenProjectViewer-Mesh 2010-12-02 13-31-51-57ProjectViewer-Mesh 2010-12-02 13-29-59-62ProjectViewer-Mesh 2010-12-02 13-28-15-69ProjectViewer-Mesh 2010-12-02 13-26-39-00ProjectViewer-Mesh 2010-12-02 13-18-35-72ProjectViewer-Mesh 2010-12-02 13-16-53-52ProjectViewer-Mesh 2010-12-02 13-10-30-13ProjectViewer-Mesh 2010-12-02 13-03-22-38i feel like a twin peaks - Torley Lindenorange and black - Torley Lindencold projection - Torley Lindencrates, lots of them - Torley Linden
oh you're freaking me out - Torley Lindenorb lula - Torley Lindenadventure awaits - Torley LindenDepth of Feel


* This is a Beta so to set your expectations, stuff is subject to change. Also, while making these features visible is supported, stuff contained inside — like the myriad Advanced options — is not necessarily, unless mirrored by something already surfaced. Augh, subtleties.

Torley Linden

My Tips & Tricks are directly influenced by what you — Residents of Second Life — ask for (my inbox, comments, the forums, inworld itself) because useful + fun knowledge has a massive effect on your inworld experience. From "I wish I knew that earlier!" basics to "This should be a supported feature..." esoterica, it's my call of duty to keep you covered. I'm like your Vault Boy in times of the post-apocalypse, know what I'm sayin'?

http://farm6.static.flickr.com/5006/5227246978_04d87ce07c_z.jpg

Inevitably, I received requests to teach you (as a fellow artiste, hehe) how to do the experimental depth of field (DOF) effect that was introduced into a cutting-edge build of the Mesh Viewer. (Thanks for the heads-up, Runitai!) Long ago, I had a manual tutorial on such a thing, and while this feature doesn't let you get hearts-and-stars bokeh, it's still snazzy and BUILT RIGHT IN. Whether you take photos or make movies in Second Life or just want a more "gamelike" experience — since a DOF shader effect is in many hot titles, including the impressively bleak Metro 2033 that I recently soldiered through... "ARTYOM! SHSHSHSHHH" — depth of field is pretty. But it's not just eye candy, because creative expression is an ultimate power.

So yeah, obligatory video so you can cut through the claptrap and get to the good stuff:


Big red disclaimer that THIS IS PROTOTYPE, Resident-contributed videos, text instructions and more tips are on this help page, feel free to edit it. Make it awesomer. Let's show the world what we can do. You know the thrill:

Depth of field (DOF) help page

post ur pix and vids in comments plz ^^


Trivia: there are 6 references to games that use DOF above. Spot them all.

×
×
  • Create New...