

Nacy Nightfire
-
Posts
1,084 -
Joined
Recent Profile Visitors
2,529 profile views


-
A gazillion thanks, Aquilla. I have your links, photos and instructions downloaded to a pdf file for future reference. I'm looking forward to a future project of creating my own customer avatar - no doubt a long hard rewarding journey I hadn't planned on taking, but now I can't resist!!
-
Aquila, Thank you so much! I know that took a great deal of time to put together. And I really appreciate the help with the settings! I tried my best to read and understand the Blender manual on the topic, but without success. If I am suggesting a selection order different then yours, I defer to your expertise. I'm not sure why I get the order mixed up, but I'm probably suffering from opposite-itis. 😄 (And I've been absent from SL so long I didn't even know there is a Ruth2! I'm pretty overwhelmed with all the changes.)
-
Note the settings on I last posted are not the default settings. I continued to mess around working on my monkey sample some time trying to get a good result. I could not understand the the settings as described in the Blender manual, however by using my trusty "many tedious re-dos and fail" method, I landed on these settings. It worked perfectly and it only cost me a pound of ground beef neglected on the counter until it became too warm to safely cook (because I couldn't let this go and time stands still when I'm trying to figure something out in Blender...) Here are the operator settings that worked for me:

-
I thought so too Aquila, but I tried this both ways and I got better results selecting in the manner I described. I double checked my work a few times before I posted, as it did seemed odd. But I encourage anyone trying this out (saving the file first, of course) to try it both selection methods and evaluate the results. ........ I just tested this out with two copies of the Blender monkey head, making changes in the geometry of the target version. It does seem you need to select the "UV FROM" object (source) and then the" UV TO" object (target), however, in this instance, my results were a bit were messy with connected edges crossing islands. There is an operators panel that has a a number of features to play with so I'll do a bit more research here when I have more time. I had accepted the default settings when using this on my initial geometry I was working with. It may have just been a bit of "beginners luck" that I got nice results in that instance.

-
Is it possible this tool/modifier is what is generally used to adapt the UVs of custom human avatars to align with the UVs of the SL avatar? I've often wondered what kind of work goes into that kind of project although I am not actually interested in delving into such a project, myself. Likely this method would not produce an immediately perfect result, but might get one well into the ball park. I've taken a long absence here so I'm not fully up to date with more relatively new features in SL such as BOM. No doubt this topic been discussed at length and doesn't need to be commented on, however I'll just mention it here as an example of where one might want to transfer UVs of two similar, but not identical models. (As an aside I'll just say it's difficult to categorize one's skill level, but, as a Blender user, I've reached a point where I can somewhat understand what Maya and 3damax are discussing and translate it into "Blenderese"! I now watch youtube videos and learn a great deal from tutorials geared to those programs. It's very rewarding.)
-
arton, thanks for your welcoming words! I suspect the reason I found it so difficult to find this information is it's has limited usefulness. Still I really found it handy when I needed it. I ended up with much nicer result then I expected in Blender, but it might just be due to the geometry I was working on. Even to get an automated rough approximation of where the geometry should be split up and where the islands should be placed and orientated is a help - a little hand work to improve the results is a lot better then starting from scratch. I also suspect this function has some use that I haven't quite put my finger on. I'll report back if I every learn its intended use.
-

Is there easy way to connect the vertices diagonally?
Nacy Nightfire replied to MeshPromo's topic in Mesh
So many great tips! I'll add one of my own: You wrote: "So I'm looking a way to select the vertices diagonally when select the start and end vertices. But can't find a way for it so far. (Earlier I manually connected them but it consumes a way more time)." In Blender if you select a pattern of vertices, in this case select two diagonal verts in the direction of the selection, then hold down the CTRL and SHIFT keys then repeatedly press the Numpad + key Blender will continue the selection pattern. It's a very quick way to make this kind of selection. This shortcut also works for "patterns " of edges and faces. I just wanted to add a little edit here: You don't actually have to keep tapping the + key when holding down Shift and CTRL, however I find if I hold the +key down Blender selects so quickly I lose control and Blender continues selecting beyond the where I intend to stop.. If you are more nimble-fingered then me you might enjoy the speed! -
I removed my latest response as I didn't want to go "off topic" from my original post. Tonk, I fear you are simply baiting readers to engage with you in a tedious argument. I was not soliciting a general critique on my workflow other then as it relates to this method of UV transfer in Blender - a useful tip some Blender users might find beneficial. Your efforts, although I'm sure are well meaning, will only serve to discourage other potential participants. Even the least experienced person can have something to contribute to this forum and can pass along a brilliant tip or interesting work approach useful to someone else. Why would you want to crush their enthusiasm and discourage their contributions? I suggest you start your own thread based on the subject of your remarks. As you present your ideas here it is difficult to actually understand your meaning. I encourage you flesh out your thoughts and ideas on your topic and provide some content that would be interesting to those looking for advice on workflow.
-
Content removed by poster
-
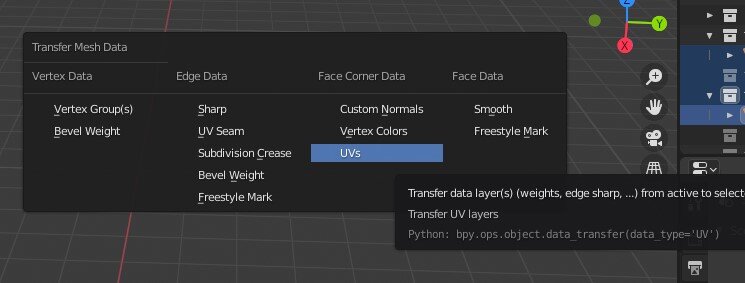
I finally solved a problem with my workflow in Blender and I thought someone might benefit from what I've learned. I tend to jump into a project with a great deal of enthusiasm and begin by creating an impractically dense model. It's simple enough to reduce the geometry at a later point and generally I use that dense model only for baking texture maps. As I start removing edge loops and work my way through the LOD levels, I often discover the lower LOD's inherited UVs become either messed up or get deleted somewhere along the way - or I completely forget to make UV's in the first place. The tedious task of recreating UVs for each LOD version which need to match up with the High LOD version is unappealing - so much so that I usually just tank the project and start over. Tonight I played around with the Data Transfer Modifier. I suspect if I knew enough about how to set it up this would likely have worked nicely to transfer the UV set up from the high LOD model onto the other LOD versions, however after spending a few hours researching this tool and testing it out, I couldn't get it to work. I then stumbled across info about Blender's data transfer Operator ( as opposed to Blender's Data Transfer Modifier) and I found it works great for copying a UV set up from a high poly mesh to lower poly versions. (Note: the CTL L shortcut for the "Make Links" operator which copies UVs from one object to an identical object or objects, wasn't what I was after.) The highest LOD should have a UV set up Position the "Transfer From" and "Transfer To" objects at the exact same location, such as at the world origin. In Object Mode, select the mesh with the UV set up then "shift" select the object for which you want Blender to create UVs for based on the first object selection. In Search mode (F3) type "Transfer Mesh Data" (Note there is also something similar called Transfer Mesh Data Layout, but that's not the correct choice). Once you select Transfer Mesh Data a menu grid will appear. Select UV's from the Face Corner Data column. Works like a charm. I hope someone finds this helpful.
-
Take a word leave a word (game)
Nacy Nightfire replied to Derekmate's topic in General Discussion Forum
May Day (Sorry Doris, but today is May 1st) -
Take a word leave a word (game)
Nacy Nightfire replied to Derekmate's topic in General Discussion Forum
TWO WORDS!!!! -
Are you a good conversationalist?
Nacy Nightfire replied to Gopi Passiflora's topic in General Discussion Forum
What's a conversation? Is it that thing where one starts talking non-stop at another person for what seems like eternity (to any sane-minded person), about something not terribly interesting, but described with great enthusiasm and in fine detail such as a dream one might have had the previous night of one's 2nd grade teacher, Mrs. Clark, dancing with a leprechaun and a gorilla where eventually the other person manages to elbow in and start his/her own monologue, but as he/she talks one tunes into: "hum-dee-hum-dee-hum-dee-hum" in ones head until finding the opportunity to cut them off and continue? Just wondering. -
I'm curious to know what you mean by "flawed" meshes. Blender offers selection options which easily target non-manifold geometry, attached interior faces floating interior faces*, Ngons and loose vertices, to help you eliminate these issues as a final "clean-up" step in the modeling process. Note that to specifically highlight tris, quads, and ngonsn select "Faces by Sides" then press F6 to bring up the menu that allows you to enter faces with the number of edges you want selected. I may be misunderstanding what you are posting here, but others might find this a useful to addition to their Blender workflow to clean up any meshes that might cause errors (along with the essential CTRL A in Object mode to lock in location, scale and rotation of an object.) * For any internally floating faces you would need to hover over the model and press L to select connected faces then hide them to see if anything remains unselected in the interior space and delete that then unhide the model. The "select interior faces" applies to connected geometry that is in the interior.

-
Thanks Optimo! You are a gifted teacher. I've learned a great deal from your past Blender classes at Builders Brewery. I've copied your recommended workflow for future reference. It's very helpful. My 3d skills are limited and "hodge-podge" as I rely too heavily on free Youtube and Vimeo videos for training. I realize there's alot of misinformation and poor work flow habits I've no doubt adopted that I will have to identify and "un-learn." I work in 3d only as a hobby, so try to limit what I spent, but I can see where I should invest in some good training videos authored by professionals. RE: "and you can reuse this to "steal" good topology body parts." I've finally modeled/retopologized a decent human ear with good flow and only 22 edge verts to connect to a head model. I plan to keep that one forever so I never have to go through that challenge again!!"


 Facebook
 Instagram
 Twitter
 YouTube
 Flickr