

mnp2357
-
Posts
34 -
Joined
-
Last visited
Content Type
Forums
Blogs
Knowledge Base
Posts posted by mnp2357
-
-
Hello, mesh forum friends! Long time no silly ask!
Anyway, I have improved my mesh skills a lot over the last little while and have taken on the headache-inducing, ambitious plot of making shoes. Before I went to the trouble of smoothing/detailing and texturing, however, I wanted to make sure I could rig/weight paint my fancy heel... : D
As you can probably guess, I have failed!!
The problem is simple (?): I have managed to weight paint MOST of the shoe with the goal of having it move and resize with the foot, but for whatever reason, when it comes to the heel of the shoe, it refuses to play ball. I have verified the objects are joined into one mesh and have also made sure I have all vertices selected before weight painting, but no matter how extreme I get with the settings, the heel and the very top of the shoe REFUSE to be weight painted.
Help???

-
As a user I prefer autohide or simply disabling mesh nipples for an item If it hovers away from my body, IMO it looks unrealistic.
-
Well, team!! I joined it to one piece, reduced the triangles and LODs, fixed the scale issue...
PROS
- It worked! There was no weird warping of my mesh. Everything was the right proportions and such.
- It was only 11L to upload B) That's much cheaper.CONS
- It still came out tiny as before, idk why :'D But it was easy to fix with SL's scale tools!! I'm using Blender 2.7 for reasons of compatibility with Sims 4 Studio, so maybe somehow that messed it up.
- Design-wise, it doesn't look perfect or fully realistic, but considering it's my second mesh from scratch ever, I can't complain lolol.Now I'll make some glass, get some texture, and then it's ready for sale!! B)

-
 2
2
-
 1
1
-
-
2 hours ago, Aquila Kytori said:
SL has a testing grid (Aditi) where uploads are free. You will still be charged an upload fee but the L$'s used on this Beta testing grid are only pretend L$'s and will not be deducted from the amount you have on the main grid (Agni).
Ooooh interesting... I will have to try this. It seems very handy. And ty for the tips about size!! that's definitely the problem x D I can see I have a lot to learn about changing the sizes of the basic shapes so that won't happen lol.
-
3 hours ago, GreyLasagna said:
While i don't know why the bridge of the glasses looks so stretched. I do upload many of my models without joining their parts and never had any problem with stretching, it's quite useful especially for building homes, like a door, the wood body and its lockset or the typical blanket people like to put on top of a couch or even the pillow. Pretty much anything you may want to move or hide in the future.
You may want to try lowering the "Lowest" triangles down to 0, and maybe "Low" too, depending on your result. I read somewhere else that "Lowest" and "Low" lod are the ones that impact the most on your LI and upload fee. It's a very small model... No one will be able to see you are wearing glasses from far away, it will be just a mere dot on the screen anyway.
Yeah, I know a little bit about LOD from my days of making frankenmeshes and hair conversions for Sims 4, but I wasn't too sure how much was really needed... :'D This makes sense tho lol. I will nuke the lower LODs.
4 hours ago, Chic Aeon said:I don't know anything about your modeling software but yes, uploading the size you want is a good plan. You can actually enlarge the model DURING the upload process on one of the tabs, but would be good to figure out how big things need to be in your program :D.
We all started somewhere. I learned here a decade ago right here on the forums. It takes time!
poco a poco (little by little)

Yes, that's why I'm a little frustrated the size is wrong, bc I used the models from Avatar workbench, but it looks like it probably needs to be 4x larger or so 😖 Blender is a basic, free 3D software used very often, especially by noobs, but it's also used by a lot of plugins and softwares like Sims4Studio and Avastar!
1 hour ago, Aquila Kytori said:The minimum Bounding Box, X Y Z dimensions for a mesh object is 0.01 x 0.01 x 0.01m.
If you try to upload a mesh object with one or more dimension less than 10mm then you will find that the uploader automatically stretches the model along those axis so that it complies with the 10mm minimum.
There are ways around this by artificially increasing the BB dimensions but in this case Chic is correct in suggesting that the various objects that make up the glasses should be joined to be a single object in Blender before uploading to SL.
These limits are actually why I decided to make it in blender! I tried initially to just use build tools, but it couldnt create the fine details I wanted. I should have guessed something like this might happen, but tbh I'm such a noob I didn't realize it was going to upload as linkset and not a single mesh object >_>;
It's only about 8 pieces, so joining it is no problem. Since the finished product is larger than the bounding box, it will stop stretching it if it's all one mesh? That makes sense.
Thank you all of you for the tips! This makes sense. I just woke up now, so time for a poco coffee, but then I will sit down and try all of this, then let you know how it goes : D
-
1 hour ago, Chic Aeon said:
The biggest thing to know here is that you need to JOIN all the pieces to make one larger mesh. You have small parts that are smaller than the limit for Second Life and so the uploader makes them larger. So get all the pieces as you want them then JOIN them into one mesh and try again.
Also there is no reason your mesh should cost 26 lindens to upload. 11 or 12 is "normal". This may be because of the linset rather than the single mesh. I almost never upload linksets so can't really say.
That's also too many triangle for what you are making IMO but the other is more important :D.
Good luck.
ah ok so join them into one object in blender instead of the couple of separate pieces it is rn? also, should i make it bigger? i sized it to fit the avatar workbench model, but when uploaded at unmodified scale, it came out that tiny lol q.q
i think i saw a tutorial for a quick way to reduce triangles in blender, so maybe i will do that also. im very new to make 3D objects. this took me like a week x D
-
Well... I decided to try making accessories, and it is not going well. I decided to make some glasses, and I used the avatar workbench model as a point of reference for and such, but apparently that was a mistake. Luckily I'm only 26L in the hole, but I won't be trying again until I know what the heck went wrong.
First Pic is in Blender

Second is in Firestorm preview

and the final one is the item when attached to my avatar.

-
Looking to build your traffic without sploders, fishing, or other annoying gimmicks? Consider hiring me. I have a computer which is able to run Second Life overnight while I sleep, and I often AFK at one of my places of work or on AFK Sex sims.
Availability: You can check my Calendar here for my availability. I am always available from 9PM SLT to 8AM SLT, sometimes until 10AM. Time in dark blue are available, times in light blue are taken. https://calendar.google.com/calendar/u/0?cid=dWtsNmdnNmR1Ymwxamt2b2s2MGcyaDc0YmdAZ3JvdXAuY2FsZW5kYXIuZ29vZ2xlLmNvbQ
Prices:
$10L/hour for 5+ hours
$20L/hour for 5 hours or lessIf you wish to pay me after I AFK, you will be charged a $50L deposit which will be returned to you once I am paid.
Contact: Send a NC to Mona Divine (mnp2357) with the following information:
- Your Calling Card or Calling Card of who I can contact re: Payment
- Landmark for sim I will be AFKing on
- [X] Recurring or [] One-time
- Date(s) and Time(s) you wish me to be there (in SLT)
- Any additional notes such as where I should AFK etc.Booking is first come first serve and is ONLY available during times outlines in my calendar.
-
 3
3
-
-
Management is extremely professional. Sari and Gleanr are both very experienced, intelligent, and responsive. I work one shift a week as a DJ, and the setup is super professional. Plus, they let me dance on the DJ booth, sooo...
Although I am not currently doing any sim-based sex work, I have done escort and dancer work in Second Life, and also have experience with it in RL, and Sari and Gleanr want to make this a great place to do those things at. The sim itself is incredible, everything is very professional, and they are committed to making it fun, sexy, and easy! Seriously. They're not afraid to ask people who know more than they do for advice, they're always adapting, and they've been keeping an eye on the pulse of the business.
-
1
-
-
To those checking out this "job opportunity": It's more like a diversion opportunity. You're not "required" to host contests, but it's "recommended" that you do, and the money for that must come out of your own pocket. So, if you're just looking for something fun, this place seems great. But if you're the type who cashes out and does work in SL, this sadly isn't the place for you.
-
1
-
-
1 hour ago, Quistessa said:
Just be aware that there's a slight difference between tipjars that are scripted for different people to log into and personal tip jars. all you need to make a personal tip jar is to make a prim and drop a script like this one into it:
integer Total;
string  OwnerName;

default
{
    on_rez( integer sparam )
    {
        llResetScript();
    }
    state_entry()
    {
        OwnerName = llKey2Name( llGetOwner() );
        llSetText( OwnerName + "'s Tip Jar.\nAny tips gratefully received!\nL$0 Donated so far", <.2, 1, .6>, 1);
    }

    money(key id, integer amount)
    {
        Total += amount;
        // Shortcut 'cheat' to avoid multiple casts when constructing a message including non-string items
        string str = (string) [OwnerName, "'s Tip Jar.\nPlease tip if you are so inclined!\nL$", amount, " Was donated last!\nL$", Total, " Donated so far" ];
        llSetText(str, <1,1,1>, 1);
        llInstantMessage(id,"Thanks for the tip!");
        llInstantMessage(llGetOwner(), llKey2Name(id) + " donated L$" + (string) amount );
    }
}
Copied from the wiki: http://wiki.secondlife.com/wiki/Money
Omg thank you SO much!! This is perfect. I know a little bit about 3D stuff, so pretty excited by the idea of making my own jar and dropping in the script tbh
")
-
1
-
-
I have just been informed I need a personal tip jar for one of my gigs. They... literally changed it last week, and I've never used one. What jars do you guys use?? There's so many out there, and I have no idea what I am looking for. HELP.
-
First of all, I am fairly new to SL (4 months), but I am a millenial, so I learn this technical stuff quickly. Don't worry!! I am looking to fill out my schedule
My motivations for work are to have fun, excite, stimulate, enjoy, and of course, make $L. I do cash out to help out with my RL, so please keep that in mind.
I work mainly from 10-4 SLT. My timezone is the same, so after 6PM, I am usually busy having dinner and settling in for the night. I also prefer to work adult clubs because I am here to unwind and be sexual in ways I can't IRL. I am perfectly fine to work in UK or other European clubs. I am fluent in English and French.
I am currently looking to fill any day of the week, so feel free to offer up. You can see my current schedule here: https://calendar.google.com/calendar/u/0?cid=b2hkYXJsaW5nMTk5MnhvQGdtYWlsLmNvbQ
DANCER QUALIFICATIONS & FAQ
- I have 2 years of RL sex work under my belt. I was a cam girl and text escort.
- I also have over a decade of experience writing erotica, and though emoting is a new format that can be hard with the poses and stuff, I am learning fast!
- I have about two months of experience as a dancer and freelance text/voice escort in SL.
- I have a mesh body and head. You can check my Flickr to see me: https://www.flickr.com/photos/192540265@N08/
- I accept club rates for topless/nude or general rate of $L/clothing item.
- I am also capable of being a club escort.
- I do not take jobs from anywhere which requires me to rent adboards.
DJ QUALIFICATIONS & FAQ
- I have received multiple compliments from my employers despite my relative inexperience (2 weeks!)
- I love all kinds of genres, and I am always looking for more music!
- I currently have permanent sets at four different clubs!
- I have my own stream, I am capable of pressing "New Notice", and I even make my own Promo images for Flickr or Discord!
- I like to play Indie Pop, Indie Rock, covers, remixes and Electroswing.
- I'm definitely for those who are open to or seeking a more modern/contemporary vibe.
- So if you consider Post Malone or Nicki Minaj to be out of the question, I'm probably not the gal for you.
If interested, you can contact me over IM: Mona(mnp2357) or via Discord mona#4661
-
I think I will probably decide against a group, but it sounds like brick and mortar could really be worth it once I have more stock. I'm going to work on making more stuff, and then maybe I will ask around about rentals. Lord knows I don't need much space, so I have that going for me, I guess lol.
Thank you everyone
And may as well plug while I'm here, I guess 0: (gotta update some pics n stuff, I know....) https://marketplace.secondlife.com/stores/234700
-
17 hours ago, RoxyCyn said:
Everyone will have different requirements and results depending on their product(s) and business model. Primarily, I build and sell motorcycles with a store in-world and on Marketplace. Motorcycle sales are dependent on appearance, details, ride and handling. A virtual brick and mortar storefront enables customers to see and use the actual product in the same lighting and environment to which it is intended. Fit, finish and attention to detail are clear and obvious with little room for surprises.
We all like free stuff to some degree. Having a gift available to everyone helps bring traffic to the store and shows your work. Customers that like your products can join your group and follow sales, events, specials, etc. A group gift helps grow that group. Good free stuff will bring people back and they tell their friends. Even the way you decorate your store reflects you, your product and your attitude.
Sales will be erratic, probably like a roller coaster, but patterns will emerge over time. Plan ahead, be patient and most of all have fun with it.
This works for me. Consider your goal(s) and it might fit for you as well.
Yes, I was mainly considering an in-world store for the group gift angle. For me, I prefer to err on the side of caution just because I do not have much income in RL, but I've also done business and marketing, and I know that building a brand is important, and that brick and mortar, as it were, can help a lot with that.
-
I am far from it being time for me to consider an in-world store, I am sure, but I am wondering if people who have them saw significant revenue increases compared to being only on the MP? Or how do you know when it's time to try it? When does the rental fee or premium membership become "worth" it?
Any stories or experiences you have are welcome
Unsure if relevant, but in mind I specifically create ADULT content for more salacious characters.
-
46 minutes ago, npcee said:
Well, at this point I think its important to understand what is a dev kit and why we need them. I dont have avastar either, but I must have watched dozens of tutorials with it, so from my understanding the whole point of needing a dev kit to make clothes (with avastar) is:
a) You get a model of the actual mesh body, so you can make your clothing conforming to that shape specifically.
b) The mesh body is already weighted, so instead of using the skeleton to get automatic weights, avastar will just transfer the weights from the mesh body itself and make the whole process less complicated (well In most cases, specially with pants and shorts, you still have to do a lot of work).
c) Avastar lets you adjust the body sliders, just like in SL, so its easier to test the rigging against bodies that dont use a more default shape.
So, by not using avastar you lose B and C, but you still have A. Theres nothing saying that you cant just copy the ebody body mesh, import it (without the avastar skeleton) to a new file with the default SL skeleton, use the mesh body as a guide for adjusting your skirt, and then rig it with the default SL skeleton.
There is going to be a lot more trial and error, but it should be doable. If it was like a long sleeved gown or something, then yeah that would be a pain in the butt... but a skirt that only uses ~6 bones, shouldnt be hard.
Yeah, that was my thought as well. I'd have to redo the weight painting which was like an hour's worth of work , but theoretically it is doable. If I give it a try, I'll be sure to report back here!!
-
8 hours ago, npcee said:
Hey at least we made some progress! lol
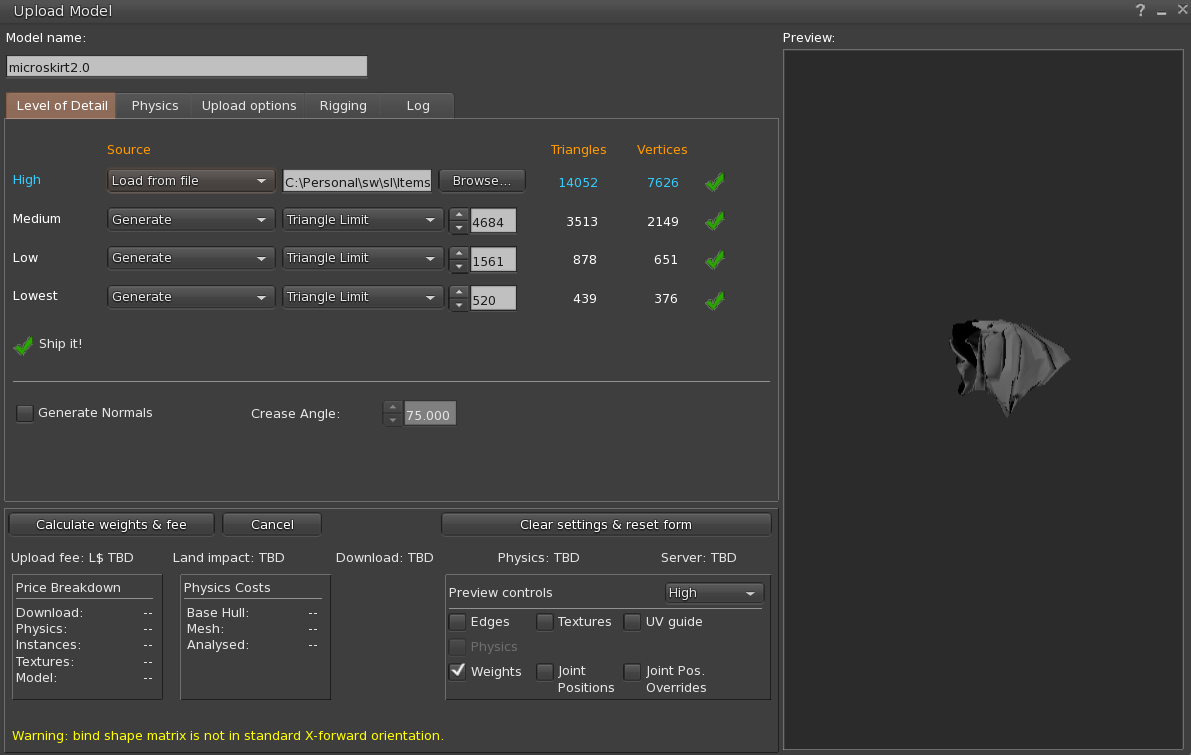
The mismatching LOD error thing, I only get when my LODs dont have the same number of faces/materials. So I honestly have no idea why you are getting this error there. In the second picture, that warning about the bind shape, if Im not mistaken I think you get that when your mesh is rotated or scaled in a weird way. So make sure to apply rotation and scale to your objects (select the mesh object in blender and press ctrl + A).
That could also explain why the mesh is deformed like that in the preview window. Another theory that I have is that maybe the armature you are using is messed up. I actually went and downloaded the eBody Kit and I tried recreating my awesome squared skirt and I got similar results to yours. The one I downloaded was made for avastar, so I dont know if its the same one you are using. The thing is... avastar skeletons have some extra binding information, and avastar uses this information in some way that is above my paygrade. All I know is that they dont play well when you try to use them without avastar.
However, as far as I know (someone correct me please if Im wrong), all these kits still use the exact same default SL skeleton (same size and position), so since you are not using avastar anyway you dont really need them. So if I were you I would try rigging using a different skeleton than the one from the mesh kit.
The one from this page is what I have used to rig some stuff before: http://wiki.secondlife.com/wiki/Mesh/Rigging_Fitted_Mesh#Download_links
You're right. It is for Avastar /: It's one of the only bodies you can get the dev kit for free. I noticed that my mesh always uploaded sideways, but I was never sure why. Tried to fix it, but it only got worse lmao. I guess that must be because of Avastar skeleton things...
I don't know how I woulddd... keep the weights if I were to switch skeletons, and it is pretty specifically for eBody.
SIGHS. Maybe I'll just scrap it and try making mesh for the ugly ass classic avatars instead. Thanks to our teamwork, I can definitely do that! I learned all of the steps and went through a ton of troubleshooting.
Maybe once I'm making more money from my shop I'll get Avastar 🙄
Thank you SO much for all of the help.
-
1
-
-
2 hours ago, Salt Peppermint said:
I personally don't work in Blender but in Maya, however the basic process here is the same. making any kind of mesh fit you will need to skin it to the body you want it to work (wear) with. hence you would need the dev kits of the meshbody or if you want it wear on a system avatar you use the SL avatar as you did. They all use the same skeleton, but they all have different base shapes and weights. You bind your mesh to the skeleton and then copy the weights from the body your choice to your clothing piece. then you need to smooth the areas that are jaggy when you rotate the bones.
Yeah I did all of this using eBody's dev kit
-
2 hours ago, npcee said:
Im pretty much in the dark here, lol. So heres the thing... how about I show you how I do it, then you compare with the step-by-step you are doing yourself? Maybe the tutorial you are following is just missing some point. Now please bear in mind Im pretty much a noob when it comes to this stuff so I have no idea if this is the "proper" way of doing things, but like you said in your first post, most of the tutorials we find are for avastar so we are left with a lot of trial-and-error.
1) So, first, I made this super futuristic and fashionable squared skirt then I subdivided it a lot to add geometry.

2) When I was happy with the position and size, I selected the skirt, then holding shift I also selected the armature (skeleton), then right click, "Parent" --> "Armature Deform" --> "With automatic weights".

3) What this does is, blender will get the bones from the armature, create an armature deform modifier for the skirt using them, and also automatically create the vertex groups, giving automatic weights for them. Now, no matter if you are using blender with or without avastar, its 99% unlikely that it will be a perfect job... so most of the time you'll have to do some adjusting yourself. In my case, I thought my squared skirt was already perfection in skirt form, so I didnt have to do it (also cause I suck at this, but theres tons of good tutorials on youtube).

4) Next I selected the armature, went into pose mode and moved some bones to see if everything was deforming ok.

5) Then, just to be sure, I now selected the skirt, went into weight paint mode and checked the vertex groups. At this point I deleted all the vertex groups that werent having any influence in the skirt (like head, eyes, arms, etc). You dont HAVE to do this, but its easier to work when you dont have that list of 100 bones. (edit: actually you do have to do this if you go over the limit of bones that the uploader allows, which I think is like 110 maybe...)

6) Next you go back to object mode, select your skirt and export it as collada. I think ever since 2.8 blender now has a preset specifically for exporting rigged mesh to SL. So you make sure to select that present and, SUPER IMPORTANT make sure to mark the "Keep bind info", or you'll get something very wonky.

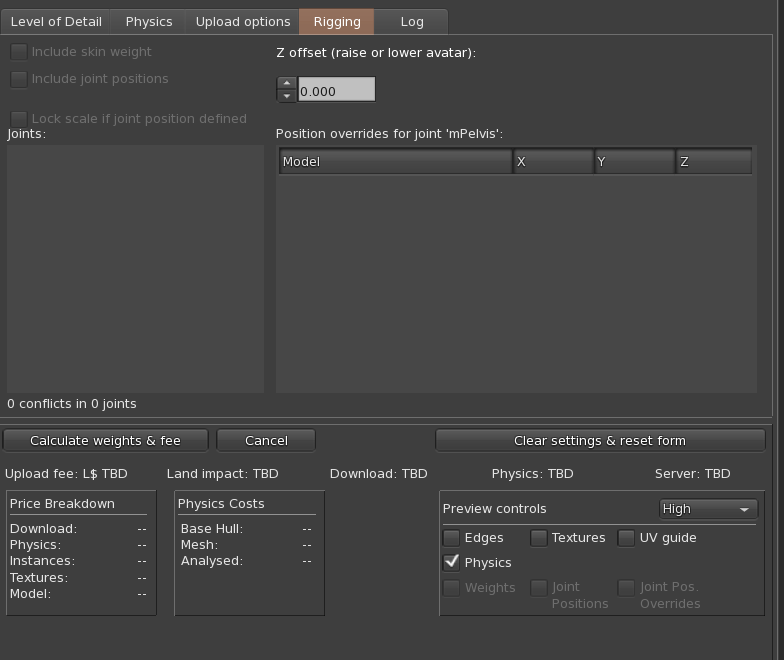
7) If you did everything right, when you try to upload the mesh to second life, you'll see something like this:

Note that it shows exactly the bones I used in my vertex groups. Like I said, ever since project bento, you only need to list the bones you are using, not the full armature.
And thats it.
well thats not right 🙂
-
19 minutes ago, npcee said:
Im pretty much in the dark here, lol. So heres the thing... how about I show you how I do it, then you compare with the step-by-step you are doing yourself? Maybe the tutorial you are following is just missing some point. Now please bear in mind Im pretty much a noob when it comes to this stuff so I have no idea if this is the "proper" way of doing things, but like you said in your first post, most of the tutorials we find are for avastar so we are left with a lot of trial-and-error.
1) So, first, I made this super futuristic and fashionable squared skirt then I subdivided it a lot to add geometry.
2) When I was happy with the position and size, I selected the skirt, then holding shift I also selected the armature (skeleton), then right click, "Parent" --> "Armature Deform" --> "With automatic weights".
3) What this does is, blender will get the bones from the armature, create an armature deform modifier for the skirt using them, and also automatically create the vertex groups, giving automatic weights for them. Now, no matter if you are using blender with or without avastar, its 99% unlikely that it will be a perfect job... so most of the time you'll have to do some adjusting yourself. In my case, I thought my squared skirt was already perfection in skirt form, so I didnt have to do it (also cause I suck at this, but theres tons of good tutorials on youtube).
4) Next I selected the armature, went into pose mode and moved some bones to see if everything was deforming ok.
5) Then, just to be sure, I now selected the skirt, went into weight paint mode and checked the vertex groups. At this point I deleted all the vertex groups that werent having any influence in the skirt (like head, eyes, arms, etc). You dont HAVE to do this, but its easier to work when you dont have that list of 100 bones.
6) Next you go back to object mode, select your skirt and export it as collada. I think ever since 2.8 blender now has a preset specifically for exporting rigged mesh to SL. So you make sure to select that present and, SUPER IMPORTANT make sure to mark the "Keep bind info", or you'll get something very wonky.
7) If you did everything right, when you try to upload the mesh to second life, you'll see something like this:
Note that it shows exactly the bones I used in my vertex groups. Like I said, ever since project bento, you only need to list the bones you are using, not the full armature.
And thats it.
ok!!! i am pretty sure that i did all of those steps, but it still wasn't working, so i went back to the drawing board. clean ebody model, clean skirt. Blah blah. I learned weight painting (Kind of?).
Also, I have started this playlist for us Avastar-less schmucks to try and help us stumble through everything which lives here.
https://www.youtube.com/playlist?list=PL4nfSr3-qoFUkOHHj0_MHb6KyRv85_WzL
What I have discovered is for some reason it gives me an error about "mismatching LOD models" unless I also select the body skeleton when I export??? ? ? ??
-
1 hour ago, npcee said:
Oh, I forgot to answer your first question... ever since project bento, you dont need to use the whole skeleton to make fitmesh clothing. In fact, if you are using that full bento skeleton (the one with the wing and hind legs and everything), then you are forced to delete some bones from your vertex groups anyway because theres a limit on the number of bones you can use in your collada file before the SL mesh uploader gives you an error.
So yeah, you can delete the unnecessary bones without a problem. Since you are making a skirt, Im gonna assume here that its safe to delete the head bones, arms, feet, etc.
HMMMMM.... I feel like this is a problem lol
But I don't know... what I have done or how to fix it

-
1 hour ago, npcee said:
Oh, I forgot to answer your first question... ever since project bento, you dont need to use the whole skeleton to make fitmesh clothing. In fact, if you are using that full bento skeleton (the one with the wing and hind legs and everything), then you are forced to delete some bones from your vertex groups anyway because theres a limit on the number of bones you can use in your collada file before the SL mesh uploader gives you an error.
So yeah, you can delete the unnecessary bones without a problem. Since you are making a skirt, Im gonna assume here that its safe to delete the head bones, arms, feet, etc.
Okay! So, I double checked my file.
Weights: Check
Did I upload the weights: ? ? ? ?????
Unnecessary bones: MANYI'll delete the unnecessary bones and make sure that the weights are uploaded, because I remember I wasn't sure what everything was, so who knows what I did lol. I assume if the weight doesn't show up on my skirt's heat map, I probably don't need it, so let's go with that. 🤪
Thank you so so much for the patience. I'll be sure to send a free copy your way when it's done if you want lol.
-
15 hours ago, npcee said:
Hum... if the skirt is rigged to the collision bones, it should be affected by the sliders. So, I can only think of two possibilities here... either the vertex groups for the collision bones you are using are not "painted" or when you are uploading the mesh to SL you are not marking the rigging options (I think firestorm does this automatically in the newest version, so I dont think its that).
You should be able to see if the skirt is weight-painted in blender by going into weight paint mode and selecting the vertex groups corresponding to the collision bones you used for the skirt. And if you are in edit mode, select a vertice and then press N to show that side window, you should also be able to see the vertex weights:


If your mesh is showing there without the collision bones or with the collision bones with 0.0 weight, then thats the problem. Otherwise I cant really think of what might be the cause.
Oh, okay!! I'll give that a try and report back. I use Firestorm, so at least that's covered haha.


 Facebook
 Instagram
 Twitter
 YouTube
 Flickr
Back with a noob question about weight painting... :)
in Mesh
Posted
No one can ever know that making stripper heels in Second Life is what finally got me to download a second version of Blender onto my computer lol.
Anyway, literally just using the latest version appears to have solved my problem (if you're curious, I was until now using an old version because that's the compatible version with Sims4Studio lol). My guess, after a little poking about, is that it had to do with some of the vertices being "inside" other parts of the object, which is solved by the front faces only option toggle. Thank you!