

Lexii Lane
-
Posts
32 -
Joined
-
Last visited
Content Type
Forums
Blogs
Knowledge Base
Posts posted by Lexii Lane
-
-
16 minutes ago, Wulfie Reanimator said:
For emissive mask, the alpha (greyscale) determines which parts glow and how much.
The color being emitted comes from the regular RGB channels. If you have the files and you want to change the color, all you need to do is not touch the alpha.
Similarly, you could simply have the white emissive texture and tint it with the in-world editing tools.
So if I made the diffuse purple, the color emissed would be purple, but I have to do nothing with the alpha mask? I can change the diffuse color to any color I need and it will translate over?
-
Hello, I'm doing a pretty complicated build, and it has baked lighting with emissive masks. I am trying to think ahead on how the end user can customize my build via sharing textures, but I haven't figured out how to customize the emissive mask to glow custom colors when I export it from PS. For instance I would let the end user have access to the raw files that they could change the color from white to purple, but when you put that together in Photoshop, the alpha channel only lets me do black and white. Is there a way to do this differently? Or am I approaching this all wrong?
-
2 hours ago, arton Rotaru said:
To avoid crazy UVs I usually have to triangulate the mesh before I export it as dae. I use the Turn to Poly modifier with Limit Polygon Size to 3, and Keep Polygons Convex checked. You can also try to add a Turn To Mesh modifier, on top of the stack, instead. I also keep the Triangulate option checked in the export settings.
And as Tonk mentioned, Reset XForms should be applied anyway.
Thank you all for your help! For record keeping, I used all the reset xforms and UV's that max had to offer. I have not tried the turn to poly modifier, or turn to mesh modifiers, but I will if this ever happens again. I just went in and remeshed the piece, and the issue is resolved. Not the best solution, but it got me moving forward! Thanks again, I will keep all of these in mind if it should happen again!
-
4 hours ago, Tonk Tomcat said:
I had similar things happen when i used multiple UV sets in Maya for the same object. Deleting all UV sets but the one for the export fixed those issues for me.
Other thing that sometimes can happen: Did you maybe duplicated your mesh and accidently upload 2 the same meshes, one with UV's and the other without and because they are in the same place, you get this issue?
And my last idea: Try to delete some faces and check if you don't have faces behind those faces. This could happen when you extrude faces and accidently don't pull them out enough, or you undid the extrude, but one step less and the extruded faces still sit on top very close.
As for your last idea, I can confirm no weird polys in the background. The mesh is singular not double - but good check.
https://gyazo.com/eac0fa00069be3ab0ee59d10b46d8008
The UV Thing, I used Max's utility to clear the UV, then I used the applier to no avail. It is still doing it. My mind is blown.
-
4 hours ago, Beq Janus said:
Silly question but the texture mapping isn't set to planar for some bizarre reason is it?
What does it look like in the uploader if you toggle on the UV overlay?
If you are using FS then that is here
The latest lab viewer has incorporated my changes along with their own and you should also have that in the SL viewer too.
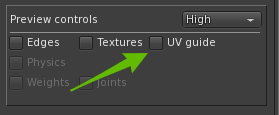
Hey there, the UV guide shows the same thing when I add a texture to the mesh. Image below.

-
Hello, Im wracking my brain with this one. I have done nothing different from what I usually do, and Im experiencing a situation where my UV tiles to not match in SL what they do in 3ds max. Below are images of what I mean... Please help 😵
Here's 3ds max:
https://gyazo.com/d43add5c99df9ea7c1bddf51fe2985f2
heres the UV for that
https://gyazo.com/acffa33b46e8f78a106524fcafc56110
Heres the result im getting in SL. Ive never had this happen before and its REALLY annoying.
https://gyazo.com/c9920eed5cbd783e19a0385cd6e7a514
-
2 minutes ago, arton Rotaru said:
If you select only the polys of a single material, you can map one by one as well. For baking maps I do detach the polys, and attach them later on again, yes.
TY! The material naming and merging of the mesh is helping 100%
-
1 minute ago, arton Rotaru said:
You can UV map the polygons from each material on their own. So with 8 Mats like in the example, I could map each colored square to the entire 0 - 1 UV space on their own. Or I could map the polygons of multiple "materials" in the same 0 -1 UV space as well.
If you have done that, and select all polygons at once, and open the UV Editor, it will look like a total mess, because the UVs are all stacked onto each other. But since they are on different materials, they will work properly.
So I'd have to break them off, map them, then attach and weld after the UV maps were done on the broken parts. But before I re-attach, I have to render the textures out, right?
-
3 hours ago, arton Rotaru said:
Indeed!
One last question: Say I have one editable poly, for instance the side wall as you have shown in the diagram. I want to have the wall and the window SILL on one UV map, and the GLASS of the window on another UV map... How the heck can I do that with one editable poly? The windows will be animated.
-
So with that I can take one mesh object and give it up to eight textures, and light those surfaces individually? I use multi materials, I wonder why its not working properly. Ill have to give the naming thing a shot next after I get done remeshing this TARDIS. You all are awesome
")
-
1 hour ago, Aquila Kytori said:
Hi
I came across a rotating Tardis on one of the Aditi sand boxes today

The probable reason you are having problems getting the physics to work properly is that the model is made up of 10 different mesh obects.
When making a physics mesh there are a couple of rules that have to be complied with.
-
1: Each visual mesh object has to have its own physics mesh object. If you are uploading all 10 parts together but with only 1 physics object then …. the result is something like you are experiencing.
-
2: The bounding box size of the physics mesh must be the same as the bounding box of the visual mesh. As Arton has already said, if the Physics mesh’s bounding box is different from the visual mesh’s bb then it will be stretched or squished to fit. Which will result in collision surfaces not aligned to the visual mesh.
Unless you have good reason not to I would suggest that you join up all the parts of the visual mesh in 3D Max so that they are all one object. Then make a Physics mesh for that single object.
If you need a part to be separate, for example for animating, then upload it separately with its own Physics shape. Doing this will almost guarantee having correct collision surfaces.
Note: In the example below the physics mesh is designed Not to be Analyzed in the mesh uploader.

The reason the vertice count is higher than Chic or Rey approve of is not because your model is too detailed or dense but because you have a lot or edge loops that would not be there if you had modeled the side panels as separate, (but part of the same object) unconnected to the rest of the structure.
For comparison, the model in the image above is very similar to yours but the panels are separated from the rest, the vertice count in Blender is around 1450 and 3500 in the SL mesh Uploader. (Sharp edges, UV islands and 6materials etc).
Ok I took into practice what you said, started bringing the models in in parts, and realized that I can start this again from the ground up keeping these things in mind. Bringing the walls in as their own objects helped with the bounding boxes, and going further into it, if I can get it all on one mesh that would be great, the problem is I need to be able to choose separate faces to let them illuminate. I read on help forums and stuff that the separate faces can be up to nine, however when I bring this into SL, it only allows me to do a max of two separate facings. I am wondering if its some knowledge I am lacking in MAX regarding mapping channels or something.
If I break the mesh up into parts, it makes it assued that each will be its own face.
-
1: Each visual mesh object has to have its own physics mesh object. If you are uploading all 10 parts together but with only 1 physics object then …. the result is something like you are experiencing.
-
Thank you all for your help, I am going to look into reinstalling my plugins, there may be an issue there. Thanks again!!
-
1 minute ago, ChinRey said:
Oh. Trust me, you really, really, really do not want to upload this as a single mesh. Mixing small and big triangles in the same mesh is the absolutely worst thing you can do if you want reasonable LoD and land impact. The golden rule is that the number of parts you split a build into should be twice the land impact, maybe a bit less.
But even so, high poly meshes don't really belong in a dynamic virtual reality and I avsolutely agree with Chic you should try to reduce the total polycount. I would estimate about 1000 should be about right for this. The way SL handles mesh, that means about 2000-3000 vertices.
You do use smooth normals for the curved surfaces, don't you?
How is the LoD? It should be possible to get it down to 2 even with good LoD.
Also remember, there this thing called lag. A good rule of thumb is to keep the number of active triangles in a scene below about 300,000. That is all the details rendered on a computer screen at the same time, not just a single item.
Well I can say for certain its not my verts and polygons, I just tried to upload a box shape, and used the same mesh as a physics LOD from the dae file. The physics model is stretched for some reason. That cant be good.
-
1 minute ago, Chic Aeon said:
If it is really that heavy I would take a LONG AND HARD look on reducing some geometry. It took me four years to come up against that issue (smile) and your box will be way too dense (and likely "primy"). I am pretty sure that while ChinRey and I don't always agree LOL, she will concur on the vertex count of your model. I suspect she didn't even think of that because there was no reason for your model to have that many vertices (smile). Lose some edgeloops :D.
The sub-surf modifier or whatever that function is called in your software is NOT your friend. Whenever I use it I then go back and get rid of all the edgeloops it made that I didn't really need to be there.
Good luck! I am glad that I had a similar issue (well documented somewhere here in the archives from January I would guess) and knew the end conclusion.
Well its not really primmy, its reading 4 LI, and the only reason for that is I have the windows, police box and doors on separate "prims" because they need to be animated independently. I had a mesh with about 94,000 verts upload without this issue last week, Ive never seen it
 Ill take a look at reducing the verts.
-
1 minute ago, Chic Aeon said:
That can happen if your model has too many vertices (I think it is around 22,000 plus a bit ) but I can't imagine your model being that dense. So I am going to guess that isn't it.
Did you apply, location, rotation and scale and move the Origin to the middle of the model? I sometime have this issue when I forget to do that.
Those two things and the wayward vertices (which I did NOT have when I had this continuing issue -- it was a heavy mesh problem for me and since I rarely go there I didn't even think) are the only three things I can think of that will cause this issue.
I use Blender so not sure how you would do the location, rotation etc bit.
PS. BOTH your model and the physic model need to have those things applied :D.
Thank you, yes, I am checking for isolated verts right now, it might be a glitch somewhere, and I will set ALL of the individual pieces to have the same axis. The mesh is around 22000 verts (blame the handles and top light)
-
12 minutes ago, ChinRey said:
Are you sure there are no loose vertices in any of the models? All LoD models and the physics model will always be automatically scaled to the same overall size at the main model but if there are some stray vertices, the uploader will include those in the size calculation.
I'm not absolutely sure what kind of object you have made but I would guess you can actually simplify the physics even further and use just a cube. Remember, the physics model is only used for collisions with avatars and physical objects so unless people are supposed to walk all voer it, a cube is enough.
Yes and yes. I also used a cube, Ill upload a picture here.

-
Okay, I am uploading a mesh. Pretty common stuff. However, when I go to customize the physics with a model .dae from 3ds max, I end up with the physics mesh seeming to be WARPED.
The shape I am uploading is basically a super optimized version of the base mesh, so I am not sure why its doing it like this. I have tried it with simple shapes too, like a box, and it ends up super stretched like this...
-
On 5/23/2017 at 8:18 PM, Rachel1206 said:
Wow, amazing mesh works and the lights are cool - well done Lexii. Is the Tardis accessible public?
Just updated the walls. Gonna be looking for transparency script now... lol
-
6 hours ago, Rachel1206 said:
Wow, amazing mesh works and the lights are cool - well done Lexii. Is the Tardis accessible public?
Also, I meshed the bookshelves and stuff, if you want a copy let me know.
-
6 hours ago, Rachel1206 said:
Wow, amazing mesh works and the lights are cool - well done Lexii. Is the Tardis accessible public?
Thanks, its actually a HandsofOmega Tardis, the Smith 50, that Ive done cosmetic modifications to.
Glad you like!
-
1 minute ago, arton Rotaru said:
Cool, I like it.

But....why Chris De Burgh?

LOL random playlist. Chris was lurking there. Plus, why not?

-
Heres what you all helped me with
-
 4
4
-
-
1 minute ago, ChinRey said:
I doubt there are many computers that can handle as many as 61 light sources (we have to include the sun too, remember) at the same time anyway. Try to do it in Blender. Add 61 lamps to a scene and run it through cycles while you're away on your summer holiday.

The number of active light sources isn't necessarily higher with ALM btw. With ALM the number depends on how busy the gpu is and sometimes it can be as low as just two.
It still works though, both with and without ALM because it si always the ones lcoests to your camera that are the active ones and as you said, you can get an amazing effect walking around in a scene. Add glow to the lamp too and you won't rally notice how few of them actually are illuminating.
It seems to be projecting the lightsource properly on the walls, its just the shadowing that suffers. The lights stay on tho. I am in ultra.
-
1 hour ago, ChinRey said:
If all prims in the linkset are to act eaxactly the same way, you can do it with a much simpler script than the one Innula suggested. Something like:
integer On;

default{
	touch_start(integer num_detected){
		On=!On;
		llSetLinkPrimitiveParamsFast(LINK_SET,[PRIM_POINT_LIGHT,On,<1,1,1>,1,1,1]);
	}
}
Of course, all those 1 digits need to be replaced with the values (rgb color, intensity, radius and fallout) you want the light sources to have.
In the end, this is the script that seemed to work best in this situation. It turns on all the lights in the linkset as needed, thank you all so much for your help with this!
-
1
-


 Facebook
 Instagram
 Twitter
 YouTube
 Flickr
Changing emissive mask color
in Mesh
Posted
ok - Sounds great, Thanks for your help! And Quarrel, thank you too!