

Nacy Nightfire
-
Posts
1,084 -
Joined
Content Type
Forums
Blogs
Knowledge Base
Posts posted by Nacy Nightfire
-
-
Aquila,
Thank you so much! I know that took a great deal of time to put together. And I really appreciate the help with the settings! I tried my best to read and understand the Blender manual on the topic, but without success.
If I am suggesting a selection order different then yours, I defer to your expertise. I'm not sure why I get the order mixed up, but I'm probably suffering from opposite-itis. 😄
(And I've been absent from SL so long I didn't even know there is a Ruth2! I'm pretty overwhelmed with all the changes.)
-
Note the settings on I last posted are not the default settings. I continued to mess around working on my monkey sample some time trying to get a good result. I could not understand the the settings as described in the Blender manual, however by using my trusty "many tedious re-dos and fail" method, I landed on these settings. It worked perfectly and it only cost me a pound of ground beef neglected on the counter until it became too warm to safely cook (because I couldn't let this go and time stands still when I'm trying to figure something out in Blender...)
Here are the operator settings that worked for me:

-
 1
1
-
-
I thought so too Aquila, but I tried this both ways and I got better results selecting in the manner I described. I double checked my work a few times before I posted, as it did seemed odd. But I encourage anyone trying this out (saving the file first, of course) to try it both selection methods and evaluate the results.
........
I just tested this out with two copies of the Blender monkey head, making changes in the geometry of the target version. It does seem you need to select the "UV FROM" object (source) and then the" UV TO" object (target), however, in this instance, my results were a bit were messy with connected edges crossing islands.
There is an operators panel that has a a number of features to play with so I'll do a bit more research here when I have more time. I had accepted the default settings when using this on my initial geometry I was working with. It may have just been a bit of "beginners luck" that I got nice results in that instance.

-
1
-
-
Is it possible this tool/modifier is what is generally used to adapt the UVs of custom human avatars to align with the UVs of the SL avatar? I've often wondered what kind of work goes into that kind of project although I am not actually interested in delving into such a project, myself. Likely this method would not produce an immediately perfect result, but might get one well into the ball park. I've taken a long absence here so I'm not fully up to date with more relatively new features in SL such as BOM. No doubt this topic been discussed at length and doesn't need to be commented on, however I'll just mention it here as an example of where one might want to transfer UVs of two similar, but not identical models.
(As an aside I'll just say it's difficult to categorize one's skill level, but, as a Blender user, I've reached a point where I can somewhat understand what Maya and 3damax are discussing and translate it into "Blenderese"! I now watch youtube videos and learn a great deal from tutorials geared to those programs. It's very rewarding.)
-
arton, thanks for your welcoming words!
I suspect the reason I found it so difficult to find this information is it's has limited usefulness. Still I really found it handy when I needed it. I ended up with much nicer result then I expected in Blender, but it might just be due to the geometry I was working on. Even to get an automated rough approximation of where the geometry should be split up and where the islands should be placed and orientated is a help - a little hand work to improve the results is a lot better then starting from scratch. I also suspect this function has some use that I haven't quite put my finger on. I'll report back if I every learn its intended use.
-
1
-
-
So many great tips! I'll add one of my own:
You wrote: "So I'm looking a way to select the vertices diagonally when select the start and end vertices. But can't find a way for it so far. (Earlier I manually connected them but it consumes a way more time)."
In Blender if you select a pattern of vertices, in this case select two diagonal verts in the direction of the selection, then hold down the CTRL and SHIFT keys then repeatedly press the Numpad + key Blender will continue the selection pattern. It's a very quick way to make this kind of selection. This shortcut also works for "patterns " of edges and faces.
I just wanted to add a little edit here: You don't actually have to keep tapping the + key when holding down Shift and CTRL, however I find if I hold the +key down Blender selects so quickly I lose control and Blender continues selecting beyond the where I intend to stop.. If you are more nimble-fingered then me you might enjoy the speed!
-
 2
2
-
-
I removed my latest response as I didn't want to go "off topic" from my original post. Tonk, I fear you are simply baiting readers to engage with you in a tedious argument. I was not soliciting a general critique on my workflow other then as it relates to this method of UV transfer in Blender - a useful tip some Blender users might find beneficial.
Your efforts, although I'm sure are well meaning, will only serve to discourage other potential participants. Even the least experienced person can have something to contribute to this forum and can pass along a brilliant tip or interesting work approach useful to someone else. Why would you want to crush their enthusiasm and discourage their contributions? I suggest you start your own thread based on the subject of your remarks. As you present your ideas here it is difficult to actually understand your meaning. I encourage you flesh out your thoughts and ideas on your topic and provide some content that would be interesting to those looking for advice on workflow.
-
Content removed by poster
-
I finally solved a problem with my workflow in Blender and I thought someone might benefit from what I've learned.
I tend to jump into a project with a great deal of enthusiasm and begin by creating an impractically dense model. It's simple enough to reduce the geometry at a later point and generally I use that dense model only for baking texture maps. As I start removing edge loops and work my way through the LOD levels, I often discover the lower LOD's inherited UVs become either messed up or get deleted somewhere along the way - or I completely forget to make UV's in the first place. The tedious task of recreating UVs for each LOD version which need to match up with the High LOD version is unappealing - so much so that I usually just tank the project and start over.
Tonight I played around with the Data Transfer Modifier. I suspect if I knew enough about how to set it up this would likely have worked nicely to transfer the UV set up from the high LOD model onto the other LOD versions, however after spending a few hours researching this tool and testing it out, I couldn't get it to work.
I then stumbled across info about Blender's data transfer Operator ( as opposed to Blender's Data Transfer Modifier) and I found it works great for copying a UV set up from a high poly mesh to lower poly versions. (Note: the CTL L shortcut for the "Make Links" operator which copies UVs from one object to an identical object or objects, wasn't what I was after.)- The highest LOD should have a UV set up
- Position the "Transfer From" and "Transfer To" objects at the exact same location, such as at the world origin.
- In Object Mode, select the mesh with the UV set up then "shift" select the object for which you want Blender to create UVs for based on the first object selection.
- In Search mode (F3) type "Transfer Mesh Data" (Note there is also something similar called Transfer Mesh Data Layout, but that's not the correct choice).
- Once you select Transfer Mesh Data a menu grid will appear. Select UV's from the Face Corner Data column.
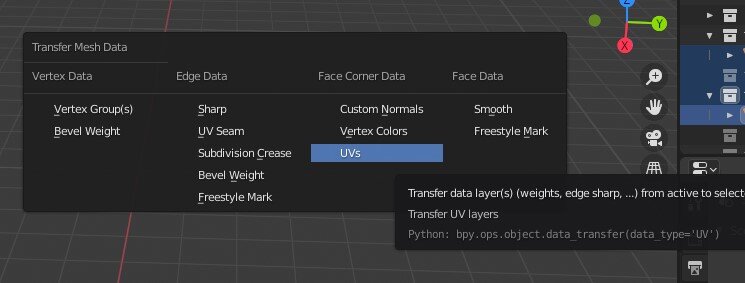
Works like a charm.
I hope someone finds this helpful.
-
3
-
1
-
May Day
(Sorry Doris, but today is May 1st)
-
 1
1
-
-
TWO WORDS!!!!
-
1
-
-
What's a conversation? Is it that thing where one starts talking non-stop at another person for what seems like eternity (to any sane-minded person), about something not terribly interesting, but described with great enthusiasm and in fine detail such as a dream one might have had the previous night of one's 2nd grade teacher, Mrs. Clark, dancing with a leprechaun and a gorilla where eventually the other person manages to elbow in and start his/her own monologue, but as he/she talks one tunes into: "hum-dee-hum-dee-hum-dee-hum" in ones head until finding the opportunity to cut them off and continue? Just wondering.
-
3
-
-
14 hours ago, animats said:
Mesh reduction with retopology is the way to go, but many of the tools for it are brittle. Some don't like meshes with errors. At one time I was trying out various mesh reduction algorithms, in hope of finding a usable open source replacement for the one in the viewer's uploader. The ones that are free crash on flawed meshes, and the ones that are robust are expensive.
I'm curious to know what you mean by "flawed" meshes.
Blender offers selection options which easily target non-manifold geometry, attached interior faces
floating interior faces*, Ngons and loose vertices, to help you eliminate these issues as a final "clean-up" step in the modeling process. Note that to specifically highlight tris, quads, and ngonsn select "Faces by Sides" then press F6 to bring up the menu that allows you to enter faces with the number of edges you want selected.I may be misunderstanding what you are posting here, but others might find this a useful to addition to their Blender workflow to clean up any meshes that might cause errors (along with the essential CTRL A in Object mode to lock in location, scale and rotation of an object.)
* For any internally floating faces you would need to hover over the model and press L to select connected faces then hide them to see if anything remains unselected in the interior space and delete that then unhide the model. The "select interior faces" applies to connected geometry that is in the interior.

-
2
-
-
Thanks Optimo! You are a gifted teacher. I've learned a great deal from your past Blender classes at Builders Brewery. I've copied your recommended workflow for future reference. It's very helpful.
My 3d skills are limited and "hodge-podge" as I rely too heavily on free Youtube and Vimeo videos for training. I realize there's alot of misinformation and poor work flow habits I've no doubt adopted that I will have to identify and "un-learn." I work in 3d only as a hobby, so try to limit what I spent, but I can see where I should invest in some good training videos authored by professionals.
RE: "and you can reuse this to "steal" good topology body parts." I've finally modeled/retopologized a decent human ear with good flow and only 22 edge verts to connect to a head model. I plan to keep that one forever so I never have to go through that challenge again!!" -
1 hour ago, OptimoMaximo said:
"details like ZRemesher's tendency to create spiral edgeloops (!!),"
Optimo -
I agree that beginners to 3d modeling for SL do not really understand the intended work flow of Zbrush otherwise obvious to anyone at an intermediate or advanced level. The whole process is extremely daunting (to say nothing about how extremely daunting Zbrush is as a program for beginners) and those starting out "can't know what they don't know" about good practices. There are probably a few workflow tutorials out there on Youtube, but I don't remember actually looking for them when I was a complete beginner. I stumbled on this kind of info as I went along the learning curve so I made my share of stupid mistakes. I simply didn't know there WAS a workflow. ( But, I give my earlier "beginner self" an "A" for enthusiasm. 😊).
I believe the spiral issue with Zremesher has been corrected somewhat in Zbrush 2019. For anyone who might read this that is interested in this Zbrush feature, there are ways to influence/improve Zremesher results such as engaging symmetry, drawing suggestion lines with the Zremesher guide brush or adding automatic guides by creasing and/or creating polygroups then going to the Stroke menu>Curves>Curve Functions and select Borders, Polygroups, and/or Creased Edges (then press the Frame button) to create curves to influence the way Zmesher works. And there's second algorithm for Zremesher to try by holding down Alt while you activate Zremesher which is worth trying for comparison to see which gives a better result. Even with the improvements to Zremesher, it's probably always going to be necessary to review and tweak topology automagically created to fix tricky areas that need very specific edge flow for animations used in SL.
I often use ZRemesher early on to quickly create better flowing base geometry in preparation for subdividing for high poly sculpting. I don't enjoy sculpting on the random geometry created with decimation as I have beginner sculpting skills and everything goes "rubbery" on me using a decimated model. Working out this early topology seems to "keep me in my lane" as I sculpt. Once completed I'd likely hand retopolgize, simply because it's so much fun.
-
I, also, tend to model static objects and not characters, however I purchased the Blenderella tutorial from the Blender website a few years back and I finally had a moment to watch it. It's currently available for free on youtube. I find the meticulous work where the artist, Angela Guenette, who works over the model, again and again, moving the vertices almost an imperceptible amount in order to get a perfect result, mesmerizing. It certainly puts my well intended, but what I now see are essentially sloppy modeling efforts to shame, now that I understand in detail how a professional works.
Many training videos pass quickly through the necessary steps in building up a model in order to keep the audience from glazing over, but the down side of editing is you can't get the sense of how much time is devoted to getting the job done. There are many time-lapse sections in the Blenderella series, but they are easy to follow. Although the process in some areas are sped up, nothing seems to be edited out. I can only watch for about 15 minutes before I am "itching" to jump back into Blender and move vertices.repeat.
-
Remember that book "Do What you Love and the Money Will Follow"? The part the author doesn't share (I'm guessing here as I've can't remember actually reading it) is for most people all work eventually becomes tedious. Once one turns a delightful hobby into a job one will, over time, grow mighty sick of that hobby. I always felt a better version of that concept is "Do What you Don't Absolutely Loathe - Do it Better then Anyone Else and the Money Will Follow (so in your Spare Time or Retirement Years you can do what you DO Love)", but that title is not likely to gain traction.
-
2
-
1
-
-
It occurred to me having spent hours watching retopology instructional videos, obsessively reading about general topology edge loop flow and redirection and staring for hours at wire frame images, I must have been a spider in a past life. My fingers itch to move vertices around.
Anyone else love this stuff as much as I do, or do most folks see retopology as as a necessary evil in their quest for the perfect 3d mesh?
Note: I live for a great UV unwrap challenge, as well. It puts me in my "happy place".
-
1
-
-
Noodles Lager

-
1
-
-
Endangered Animals

-
2
-
-
I don't censor my use of SL in RL because it's a source of great hilarity. On the other hand, depending on who I'm talking with, I may or may not divulge my SL avatar name.
Mostly RL friends have found my SL antics entertaining, although the majority don't really understand why anyone would waste the amount of time needed getting over the hurdles necessary to achieve the full SL experience. When I showcase 3d items I've made and describe the real friendships that have resulted from various phases of my participation in SL, RL friends began to understand the appeal. As SL cannot be described simply as a social media site, a market place, a educational hub or an anonymous arena to play out one's intimate fantasies, folks do tend to glaze over as I attempt to defend SL as not simply the virtual sex arena described in salacious new articles. I did find mentioning the past participation of NPR's Science Friday program gave SL a bit of gravitas.
A few friends years later admitted, having learned of my SL experiences, they quietly attempted to join, however they didn't have the time or patience to follow through. In some instances I was surprised by their confession as they previously expressed great skepticism. Perhaps my enthusiasm at the time was infectious. It does take a fair commitment and focus to 'un-Ruth" oneself, to learn the rules and etiquette of SL and to build up a dependable group of friends necessary for a satisfying social experience. Add to that a need to constantly upgrade hardware to keep up, it's a no-go for many people. That last bit finally took me out of the game except for my current very limited involvement.
-
1
-
-
geodesic polyhedron

-
2
-
-
1 hour ago, Selene Gregoire said:
so it looks like Starex/Light Waves has been gone for a few years now. Unless Lankarion is Starex. ¯\_(ツ)_/¯
And my sincere apologies for both my run-on sentences and my obnoxious tenacity towards making my point. I can't seem to help myself on either of these two accounts.Those folks who devoted a great deal of time in SL creatively likely do drift in and out over the years. Probably over time they are more out then in because old friends depart and SL becomes unfamiliar and t's tough to re-capture the past magic. SL is very "Peter Pan" like in this way. It seems almost impossible to go back and recreate those early days of having an almost childlike enthusiasm for the place. And it feels a bit odd to be around newcomers who are currently in that state. Personally, I spent many years working on my own modest creative projects and as much as I need to take a complete break for long periods of time, I can't resist returning from time to time to check out my old work, visit my old haunts and generally see what I'm missing. I assume I'm following a pretty typical pattern.
I forgot completely (!) that I bought a ton of stuff when the Greenies house closed. I'm going to be digging them out of inventory this weekend.
-
Responding to Lindal:
Perhaps. We can't know either way. Yes Starax created amazing sculptures out of primitives back in the early years of SL. He/she was impressively talented and he/she used the tools he had at the time in a fashion "head and shoulder's" above all others. However if we consider what many people now create in SL the bar is now set very high. SL is now filled with extremely impressive and exceptionally talented mesh artists, texture artists, builders and scripters, so I wonder if anything Starax could/would bother making scripted or sculpted objects of a caliber that would stand out as far against the competition to the degree his creations had in the early stages of SL. During his peak here there were far fewer participants in SL and SL had only existed a few years.
People do get deeply angry with LL for changes in their TOS. Maybe that limits their future involvement, maybe they leave for good, maybe they like creating things so much they just get over their frustration and return. Its unknowable if these people return. So we, if we wish, can hope they will some day return, even if they stay hidden and unknown. Who's to really say "all hope is in vain"? You wrote that from what you read it didn't sound like Starax would be back, but It appears your belief comes from what you read and not from a personal conversation with this person. Why is it so important for you and Selene to disabuse me of the hope that he's somewhere back in SL doing his thing but out of the limelight?
BTW I don't think any hope is in vain. It's only hope, not expectation. I hope for world peace, but based on what I've witnessed and my understanding of history, I do not have a very high expectation it will happen, at least not in my lifetime. Am I allowed to continue to hope? It would be a very unpleasant existence to be living on this planet without the ability to hope.


 Facebook
 Instagram
 Twitter
 YouTube
 Flickr
A Blender tip re: Transferring UVs
in Mesh
Posted
A gazillion thanks, Aquilla. I have your links, photos and instructions downloaded to a pdf file for future reference. I'm looking forward to a future project of creating my own customer avatar - no doubt a long hard rewarding journey I hadn't planned on taking, but now I can't resist!!