

Vendetta Fhang
-
Posts
25 -
Joined
-
Last visited
Content Type
Forums
Blogs
Knowledge Base
Posts posted by Vendetta Fhang
-
-
And we did it! Everything now works! I still had my head sinking but that was easily solved once I adjusted the skin weights. yay!!!
Now, for your MvAniMATE, will it still work the sames with my custom skeleton? If so then i'm definitely going to be buying it.
-
also optimo, in your pic the skin weight button isn't clicked, the base model shows fine until i turn on the weighted option.


It looks like the issue is somewhere in the chest?

-
 1
1
-
-
That worked but it seems that it still keep twisting the model going through fbx then dae
-
Everything just hates me apparently.....
Im not sure if Maya 2018 is the problem or not but i exported fbx, brought it into the converter and it wont convert.
If i select DAE, it doesn't do anything when i click convert, If i select obj then it populates a txt file that says that it couldn't convert because the file is corrupted.... v.v
-
So i think something is off with the original source file. I opened the maya scene and exported the female and male versions without doing a single thing to them and both of their heads and shoulders are always inverted


-
The animation i’ve come to realize is due to the fact that for that portion, i need Y up and X forward before i begin animating. So one problem solved.
Still have to figure out how to stop the model from imploding.
-
 well that kinda leaves me no where left to go. Checking the joint position box is what keeps imploding my mesh.
I’m animating in maya, setting keyframes and using the bvh script provided on the SL wiki.
-
So I went and did just a simple animation and when i brought it in world, nothing changed with the distortion. The bones remained in the standard human position and the animation itself seems to be happening on the wrong axis. So i'm guessing that i need the 'use join position' checked when i import...
-
So I started playing around some more, I did remove the collision bones and that didn't make a difference.
So, i looked at what else i could change that i hadn't tried and the obvious choice.... clicking the 'use joint position' option on the upload. I have been selecting this for every upload and when i didn't, i got exactly what I was expecting. Will this be an issue moving forward or does it simply not matter for this purpose?

-
1
-
-
Thanks for your earlier advice. I made the changes but It still keeps crumbling in on itself. I'm not sure if there is something that i'm missing prior to binding. I even tested it without moving a single bone from the imported rig and it did the same thing.
The steps I took.
-create new scene and make Z up
-import rig file that is provided from SL wiki
-Unbind the female shape and deleting the mesh
-import new mesh and scale to size
-begin moving joints into position.
-Bind skin and export.
Is there a specific bone that shouldn't be moved at all? Could it be an issue with my model? I appreciate your help


-
Thank you so much! Im gonna get right to making those changes. You are awesome!
-
Hello,
So i've got the bento skeleton and my mesh in maya, i've only loosely moved the bones into place and did the binding. Mostly so i dont spend hours only to find out it isn't working because I did a similar thing in the past.
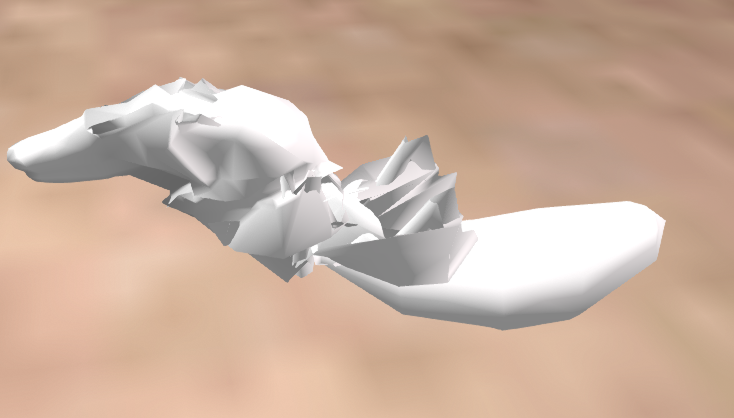
With that said, when i go to upload, i see the object one way but when i wear it the mesh crumples in on itself. Pictures below. Not sure what's happening since the joints all seem to be in the right place and displaying properly in the preview upload section. Any help would be greatly appreciated.


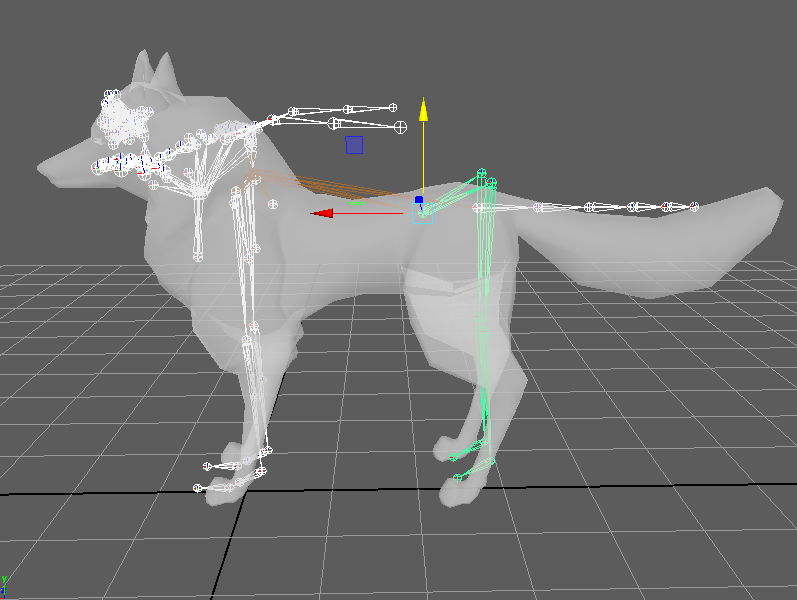
-
Hello,
Im a 3d artist by trade and am looking to join up with a group to put my skills to use and start making sl items. I can model and texture. If interested message me in world or send me a pm.
Thanks,
V
-
Im using maya and there was no second uv set. I think sl simply didnt bring it in. I started a new scene and imported the file and re uved the object and the new import is working fine. Thanks everyone for you help
 wish sl was less of a pain sometimes
-
1
-
-
i already have that on as i stated earlier but its clearly not the problem. Not even my diffuse texture is showing up properly.
Idk if it has to do with the mesh itself that sl is giving me such trouble because here is the exact same nrm applied to an sl prim and it works

-
i already tried it with no dif. and there were no results. if i put the nrml on just a flat prim if showed up but not on the model i made for it. The Uv's are layed out perfectly and they are not reversed. I have advanced lighting on.
these two are when i put a dif map on it only that i had simply baked the nrmls into

These are the ones where i placed the nrm map into the object


-
i have a normal map but when i plug it in there is no visible difference on the object. This is my first attempt at nrml in sl so other than the videos of people doing the same thing im not sure if i missed a setup or not.
-
I'm in the process of creating several mesh avi's and am looking for someone that is interested in possibly being a co-owner of the store. I'm still dabbling in the start of creating animation for sl but if you have the skills too do both that would be great. Either way i need someone that knows how to put together huds. Please NC me on SL or through a PM here. Thank you :D
-
Yes i have uploaded a succesful rigged mesh but it was some time ago.
You were right about importing it into a scene. I can't believe it was so simple and i missed it. Thank you so much *hugs* Now comes the fun/tricky part of geting the joints into place and weighted
-
Im using maya and im trying to rig a quardruped avi. No matter what i do when i try to import the model its not registering that it has a rig and skin weights. In maya everything moves fine but not on sl. I dont have the option of checking skin weights or anything in the import window. Does anyone have any idea of a step that i may have missed? And yes i've selected the root of the skel and the mesh before exporting Please... i really dont want to pend weeks trying to figure this out
-
I havent been able to log into the beta grin for 2 days now and i know its not my internet because i can connect to the main grid fine. Are they doing testing and for how long?
-
When you imported them seperately were they at least grouped together in maya?
-
1
-


 Facebook
 Instagram
 Twitter
 YouTube
 Flickr
Normal Map not noticable
in Mesh
Posted
So i have a normal map for my shirt but when i plug it into the bumpiness section i'm not seeing anything change. i'm on the beta grid testing and using firestorm viewer. Not sure if i have to turn on a specific setting in the viewer or if i'm missing something. File is png.