

Lydia Alberti
-
Posts
39 -
Joined
-
Last visited
Content Type
Forums
Blogs
Knowledge Base
Everything posted by Lydia Alberti
-

Why is the triangle and vertices count all the same?
Lydia Alberti replied to Lydia Alberti's topic in Mesh
Hi, only just seen all these messages and I should've provided a screenshot of the model but yeah the only reason why I only relied on the Auto LOD system was because the part of mesh that had the problem were small cylinders that were duplicated using the particle system - so it wasn't entirely important to make my own LODs. But anyway, here's a screenshot of the mesh. Anyway, I fixed the problem by decimating it - it reduced the poly count by a lot! Initially I triangulated it, but it still wasn't able to get the numbers down all the way, so the LI was still returning something like 35, so I scrapped pre-triangulating it. But now that I've decimated it, it was able to properly upload it and reduce the LI to 1.
-
I uploaded a small part of the mesh and only this component has this problem where when uploaded the triangle and vertices count are all the same! It's not usually the case but why is it here? Because of this I can't change the LODs - Yes I'm aware I can make my own LODs, but here it's not very important to do that. EDIT: Think I fixed it by triangulating the faces in Blender. Can someone explain why SL does this then?

-
Yesterday I modified a sky and water preset and today when I logged in, it didn't apply them as I did yesterday after modifying it. But today when I wanted to apply them I was greeted with this "lovely" error: https://gyazo.com/596d0d66d7c91cfc323eb94523220009 Anyone else have this problem and know how to fix this?
-
Final update: Fixed it Turns out I had to repair my antivirus. I was then able to restore the Firestorm exe and now I'm loading up.
-
OK turns out the anti-virus was moving the installers into the virus chest. Also the Firestorm executable that I mentioned was missing, is also in the virus chest - but that for some reason can't be restored while the installers could be restored! Now I'm trying to reinstall, but it says it can't open the executable, it gave me the option to abort, retry or ignore. None of which I want!
-
I downloaded the new Firestorm, I tried to install the first time. It finished but it was missing the Firestorm executable file to start Firestorm. So I clicked on the installer again, only for it to abruptly stop and the system deleted the installer exe. Then I went download the installer from Firestorm again only for the system now warning me "You don't have permission to save in this location". So I tried a different location (desktop). After attempting install again, it did the same thing again and now that I try to download the installer onto the desktop it's now throwing "You don't have permission to save in this location" again! Is anyone else having the same problem? Please help!
-
Overlapping semi-transparent textures with alpha blending
Lydia Alberti replied to Lydia Alberti's question in Creation
Thank you, this is the confirmation I needed to avoid this - I tried to look for solutions or work arounds like ordering how it's rendered or the material index (had no idea if I did them even remotely correct) but they didn't work. To get the feathers looking the best that I can without having to model the fine detail (want to keep it as efficient as possible) I'm going to stick with the alpha masking method. It provides the most decent result and one that I'm happy to go with. Thanks -
Overlapping semi-transparent textures with alpha blending
Lydia Alberti posted a question in Creation
I usually don't have problems applying semi-transparent textures with alpha blending but suddenly in my new project, it's not working. I have a mesh that has loads of feathers on top of one another and I applied the texture to it. But when I did, it looked like u can see through the textures where the mesh is overlapping. Does any one have idea how to fix this. I tried alpha masking but it doesn't have the results i want - where the small gaps in the features are it has a horrible clipping effect. So I preferably want to keep it in alpha blending mode. Here are some screenshots: https://gyazo.com/c17a01af8bb8b2357562ae1c88d0ec39 https://gyazo.com/5ed35ced0194c7f9dfc5ca07af877873 Here I'm using alpha masking at 20% and u can see its not the result I want, the ends of the feathers aren't very delicate and light - whereas alpha blending achieves that: https://gyazo.com/3fc19c14f8194cb89798b5b1f6d04743 -
Thank you for the link! I have not watched this one so that's probably why I have no clue haha. I'll definitely give this a watch thanks When you dividing the parts, I'm assuming you mean the flooring and roof? Cos at the moment the actual cylinder part, the walls and the fence are all seperate. If thats the case, then I totally understand where you're coming from. Originally, the cylinder part in terms of the flooring and roof were seperate, but I joined together in blender because i thought it would be logical to merge them as one for the material.
-
Thanks so much for clarifying that! It seems from your description, I uploaded as a linkset. I also tried to join them in blender apart from the doors and uploaded that too but didn't change the physics mesh and still had that problem. I'll have a dig in your youtube playlist to see if I can get it working that way. But as for your recommendation was that method two, to upload all 3 as a single mesh and link them inworld? I like the sound of method one however.
-
Isn't that just the outline of the mesh rather than the bounding box? This is setting it in the viewport display on the object: https://gyazo.com/1c8d0bc96b77ad5d9e3afe42805de4c2
-
I could give that a shot, thanks. I think in the Z-axis i wanna say the bounding box might be of by like 0.1 or something minute. Also in 2.8 it looks like they got rid of the bounding box viewport So have to set the bounding box in the viewport display for each object
-
Oooh yes please! If you can give any pointers that would be awesome, as I would love to take them into the next project with a better idea of what to do next time https://www.dropbox.com/s/qy36wwmugs90ik2/physics_model.blend?dl=0
-
Yeah, sorry I haven't been exposed to many, but I've only seen from the most popular furniture brands, that have uploaded it as one so I always had the impression that that was the "way to do it". I guess there isn't necessarily a large bank of "best practices" that I've seen so far, so I went into the project with not real sort of planning and now feeling the repercussions of it now.
-
Sorry, what do you mean by a linkset, is this meaning, a merge of the mesh in blender and uploaded into SL or is this uploading it in pieces, then selecting it all and placing it back into the inventory so when the user takes it out, it comes out as one rather in pieces?
-
Hi, I've used your video as a guide and I have made a simple building in the past and that worked out perfectly. The transforms were all applied to both the physics model and the mesh. However, I will admit as a shortcut, I took an older file of my mesh and basically used that as a "simplified" version of the physics model. But I will take ur advice to make it from scratch again (and to try and not be lazy about it haha). Currently the "cubes" or what it supposed to be cubes are most likely touching. I didnt realise most builders typically upload their homes in pieces, cos most of the ones I've seen like homes by Dust Bunny or Onsu, etc they are all uploaded as 1 mesh rather than a linked set, because I find it so fragile especially if the user wants to modify it. But yeah, when i made a simple one in the past, i even just use the analyze method and it was perfect. But now that this is a complicated mesh, there are so many moving parts that are hard to keep a track of. I'm trying to get better at it and its taking time, but its all a learning experience.
-
Yeah I applied the transforms for both before I uploaded it
-
I've spent so long trying to figure out the physics model for my house and it's driving me nuts. I've read every post on here about it and I still can't figure it out. I have made a physics model and I know about the bounding box issue where the physics model will stretch to the bounding box of the high LOD mesh. But I don't understand how to fix that. Here's the high LOD: https://gyazo.com/6e7cbec5016c6d81d66f558919074bdb https://gyazo.com/e86d11c30f6c70a4aa48d617bdce402d Here's the physics model: https://gyazo.com/71ae50d9e7c37444d6a7b2fb68ecd17a https://gyazo.com/ad122de80f9f80ac5b6e6e670153a8c6 I would post a picture of it uploaded on second life in the uploader, showing the physics but for some reason it's stopped showing the physics preview when I upload the physics model, but anyway, parts of it are stretched and some objects are in the wrong position. Also it has the red lines so I'm not able to upload it because its saying the object has too many triangles (or something along those lines) Now I've done something and now my physics model isn't even appearing in the preview but it is uploaded. And when I upload the mesh, there isn't the option to change it to "Prim" I even tried the other method, which is setting the physics to either the high LOD or the medium LOD then hitting "analyze" but the problem says that the number of hulls exceeds 256 and not sure how to fix that either. Does anyone have any advice regarding this? Also is it better to upload in Firestorm or the Second life viewer?
-
Ahhh you're not wrong there haha. Would it be easier to recreate it with fewer poly's or is there another way to reduce the poly count?
-
For me, the problem is as Pam has mentioned, I have too many tris. So I tried to decimate it - that helped the weird triangle artifacts however, the land impact has gone up by a significant amount.
-
So I've tried to decimate the seperate parts that have a lot of tris (the donuts have 53000 tris, while the pink roses have 31000, and the rest are under 20000 tris and they don't seen to have problems, only the donuts and the light pink roses have the weird triangle artifacts), and when I joined them again and imported them back into SL, the Land impact is now really high? Do you know why that may be?
-
Hi, good question. What I meant was when you create seperate meshes in blender, apply a material to each part then press Ctrl + J to merge the seperate parts.
-
I have a mesh which I've merged in Blender. However, I'm getting weird artifacts when I'm applying the textures using the "Select Face" option, to target each material in the mesh, as they've been merged. However one combination of meshes produces artifacts and I have no clue why and not anything else. Below is a snapshot of what's going on. Any help please?

-
Suddenly I'm having teleport problems, and get disconnected
Lydia Alberti replied to Lydia Alberti's question in Technical
Seems like 130+ms sounds normal, given that I'm quite far from the SL servers, so I hadn't thought that was much of an issue. For now it works perfectly fine, so I shall keep an eye out. Thanks v much -
Suddenly I'm having teleport problems, and get disconnected
Lydia Alberti replied to Lydia Alberti's question in Technical
So I ran it again and this is what I got: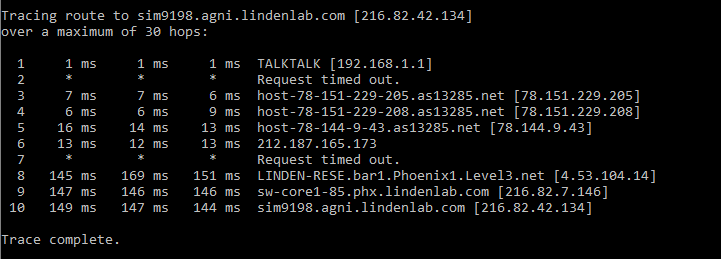


 Facebook
 Instagram
 Twitter
 YouTube
 Flickr