

canobu Almodovar
-
Posts
43 -
Joined
-
Last visited
Content Type
Forums
Blogs
Knowledge Base
Posts posted by canobu Almodovar
-
-
-
for put it as my avatar image

ok, that was all, thanks -
for put it as my avatar image
ok, that was all, thanks -
i finally decided retopologize a new mesh very very low poly with snap, this new with only 141 triangles -> impact 3now is 5 baked textures

I will do more tests of up with physical, now is only phantom + invisible floor
-
I can think of as a funky-solution for this problem:
1. Making selection around the edge of the UV-end
2. Filled the border selected with a neutral color high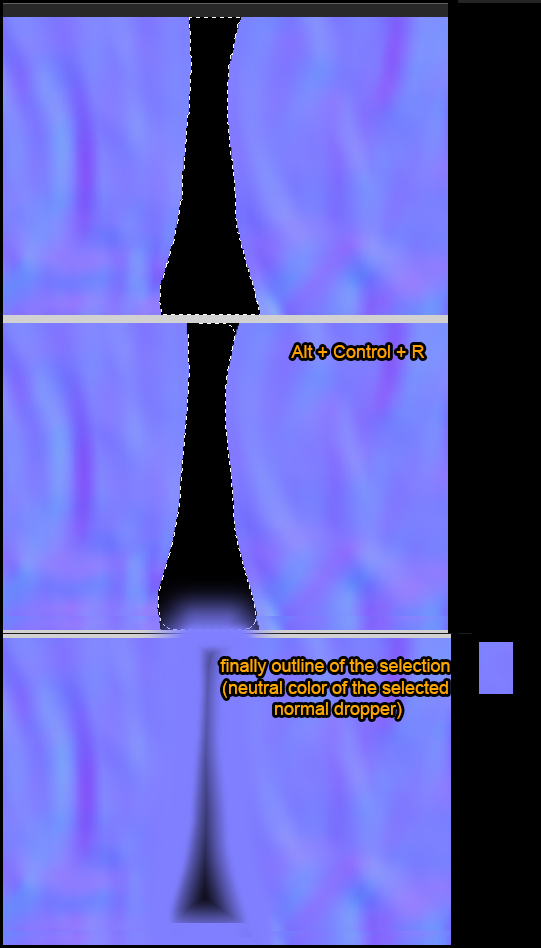
-
http://community.secondlife.com/t5/Mesh/survival-Blender-notes-3-english-amp-spanish/td-p/2706402
some notes about blender :catembarrassed: -
Survival Blender notes.
These are my notes from blender, I hope it will help
(you may have some errors sorry for the translator)Process:
1. References
2. Modeling (3 phases )
2a. Base ( initial low poly)
2b. Sculpt Mode / multiresolution .
2c. Retopologizing ( final low poly)
3 . UV
4. Textures ( difuse , Oclussion , normal, specular )
5 . Skin
. . . . . . . . . . Controls Basics . . . . . . . . . .
views , viewers, interface
7, 1 , 3, Top , Front , Right
Control + 1 , Control + 3 Back, Left
5 orthographic / perspective
Z solid / wire
T left side panel
N right side panel
. Focus Camera on selected object
selection
A selection all / nothing
B rectangular selection
alt edges LOOP selection
control + alt edges RING selection
edit
Tab Edit Mode
Shift + A add
Shift + Tab snap
Control + Tab vertex , edge , face
X clear , dissolve
Shift + D clone
G , R, S move, rotate , scale
X , Y, Z axis transformation in that
Shift + ( x, y , z) not on that axis transformation
Control + R loop edge
Control + R, + to add more edges
K knife
mayus accuracy with push and other modifiers
p separate (detach)
. . . . . . Special Controls . . . . . .
M switch Layer
U Unwrap
. . . . . . . . . . Sculpt Mode . . . . . . . . . .
G Grab, stretch
F brush size
Control Inverse Operation
Retopologizing
A + shift plane
Tab Edit Mode
Shift + Tab snap
U UV
texture Paint
the object must have UV ( U) ,
creates a window to view the UV and in that window creates new ( +) and save it
in the 3d window, select Texture paint mode , displayed in Texture mode , N / shading / MultiTexture / shadeless
not forget to save changes progressively map ( alt + S )
N, Shading , MultiTexture , solid texture or shadeless ( for a better view , without glare or shadows , which you paint on the object )
Bake or Normal Occlusion
the object must have UV ( U) ,
creates a window to view the UV and in that window creates new ( +) and save it
1. Selected sculpted version
2. Mayus + Selected low poly version
3. Render panel (the first panel, the camera icon )
4 bake mode: Ambient Occlusion Normals or
5 Selected to A,, ,
6 finaly bake
Skin (transfer vertices weights riggeado an avatar and an item of clothing )
Blend file at first you modeled item (clothes).
On the other you have the blend file with your SL avatar rigg bones.
Export item in obj the second file (not dae , because then you will fail to try uploading to SL. Dae only to eventually export to SL. To make as merge in 3ds , ie to pass the object blend file to another blend file must be exported in obj)
linen blend file - > export obj -> blend avatar file - > export dae -> SL Viewer
1. Selected . clothing and bones
2. Ctrl + P -> Armature Deform with empty Groups
Three . Selected . av. and clothing - > Weight Paint - > Transfer Weights
Shape Keys ( morphing )
1. Selected object
2 . Panel Data, Shape Keys, Add ( +) 2 times
3 click . Icon in thumbtack
4 . Sculpt mode
5 click . Icon in thumbtack
6. Change value from 0 to 1
,,,,,,,,,,,,,,,,,,,,,,,,,,,,,,,,,,,,,,,,,,,,,,,,,,,,,,,,,,,,,,,,,,,,,,,,,,,,,,,,,,,,,,,,,,,,,,,,
Apuntes de supervivencia de Blender.
estos son mis apuntes de supervivencia de blender,
espero que estos apuntes puedan servir de ayuda a quien los necesite,
Viva blender!
1. Referencias
2. Modelado (3 fases)
. Base (low poly inicial)
. Sculpt Mode / Multiresolution.
. Retopologizing (low poly definitivo)
3. UV
4. Texturas (difuse, oclussion, normal, specular,)
5. Skin
. . . . . . . . . .Controles Basicos. . . . . . . . . .
vistas, visores, interfaz
7, 1, 3, Top, Front, Right
control + 1, control + 3 Back, Left
5 ortografica / perspectiva
Z solido / wire
T panel lateral izquierdo
N panel lateral derecho
. Centrar camara en objeto seleccionado
seleccion
A seleccion todo / nada
B seleccion rectangular
alt seleccion LOOP aristas control + alt seleccion RING aristas
editar
Tab . Edit Mode
Shift + A añadir
Shift + Tab snap
Control + Tab vertex, edge, face
X borrar, disolver
Shift + D clonar
G, R, S mover, girar, escala
X, Y, Z transformacion en ese eje
Shift + (x, y, z) transformacion no en ese eje
Control + R loop edge
Control + R, + para añadir más edges
K knife
mayus precision con push y otros modificadores
p separar
. . . . . . Controles Especiales. . . . . .
M cambiar de Layer
U Unwrap
. . . . . . . . . .Sculpt Mode. . . . . . . . . .
G Grab, estirar
F Tamaño pincel
Control Operacion Negativa
Retopologizing
shift + A plane
Tab Edit Mode
Shift + Tab snap
Texture Paint
el objeto debe tener UV (U),
crea una ventana para ver las UV y en esa ventana crea nueva imagen (+) y guardala
en la ventana 3d, selecciona modo Texture paint, visualiza en modo Texture, N/shading/Multitexture/shadeless
no te olvides de guardar los cambios del mapa progresivamente (alt + S)
N, Shading, Multitexture, texture solid o shadeless (para ver mejor, sin brillos ni sombras, lo que pintas sobre el objeto)
Bake Oclusion or Normal
el objeto debe tener UV (U),
crea una ventana para ver las UV y en esa ventana crea nueva imagen (+) y guardala
1. selecc version esculpida
2. mayus + selecc version low poly
3. panel render (el primer panel, el del icono de la camara)
bake mode: Ambient Occlusion or Normals
Selected to A,,,
Bake
Skin (transferir pesos vertices de un avatar ya riggeado a una prenda de ropa)
En un primer archivo blend tienes modelado el item (ropa).
En el otro archivo blend tienes el avatar SL con su rigg de huesos.
Export item en obj al segundo archivo (no en dae, porque luego te dará error al intentarlo subir a SL. Dae unicamente para exportarlo finalmente al SL. Para hacer como con merge en 3ds, es decir para pasar el objeto de un archivo blend a otro archivo blend, debe ser exportando en obj)
archivo blend ropa -> export obj -> archivo blend avatar -> export dae -> visor SL
1. selecc. ropa y huesos
2. Control + P -> Armature Deform with Empty Groups
3. selecc. av. y ropa -> Weight Paint -> Transfer Weights
Shape Keys (morphing)
1. seleccionar objeto
2. Panel Data, Shape Keys, Add (+) 2 veces
3. click en icono chincheta
4. sculpt mode
5. click en icono chincheta
6. modificar value de 0 a 1
-
 2
2
-
-
https://www.youtube.com/user/AndrewPPrice/videos Andrew is the best guru in youtube, cool videos
http://cgcookie.com/ the best place for lear online (low cost be premium, but they are free videos too)
-


 thank you very much for the tips and tricks, that's fantastic phoenix can export in collada, I forgot to post the result. well this is just a first test, very basic texture. Now to make the texture resolution divide whole mesh in different parts each with its UV (floor, wall, ceiling,,), seriously I love blender <3
 -
thanks for the quick response
 youre very kind, thanks!
 -
Hi all, I was wondering if they are any some kind of way to export from blender to sl
i dislike my shop design, and it is a lot of prims SL,,, would be great be able to export some pieces from SL to blender for use as references and remodel with his bake of oclusion maps, lightmaps,,, looking as a result, improved appearance, and lower consumption of prim.
Thanks!
-
thanks, just what I was looking for, thanks!
-
For compatibility with clothes fitted mesh, the breasts should be created with the same proportion as the standard original avatar (and also be fitted mesh), then once changed the parameters of the shape to get that size of breasts, both (breasts and cloth) then would be compatible . You can try writing to the creator of the breasts, asking if you plan to get support clothing. good luck.
-
Thank you a lot Kytori, you are very kind ^__^ thanks!
-
I found the solution, nano sculpts, n_n thanks
-
Hi all n_n , this is the problem: the object in preview window, (before of be uploaded), appear ok, but when upload and rezz, it seems distorsioned as the image shows,,, then i thinked maybe no bad option make it with prims inside viewer but a sphere can be smaller that 0.01 ,, i too tryed remaking the piercing inside 3d program smaller scalling before export to dae to viewer but, same problem, the new piercing apear with same dimensions as the other, then is imposible make a small piercing?maybe they are any solution for it? thanks!!!

-
thanks ^ __ ^ ok well is only fan-art pictures (similar like when someone in devian-art draw their version of a character). I just modeled the trees and vegetation (without commercial purpose) making the trees i was only practicing blender tool to paint texture on the object (thanks to SL i have known the best free 3d program T__T)
-
-
Hi all, I was bored in blender and,,, I wish I could share this with you all
Well, is simple mesh low poly, only very simple scena, low impact.
The texture of ground include normal and specular ^__^
you like to visit the place?
maps.secondlife.com/secondlife/Eccentric%20Paradise/94/40/2001
thanks :3 -
thanks, you're very kind :3
good weekend to all ^w^
-
before
firt blender file -> export DAE object -> import in second blender file -> export DAE
then errornow
firt blender file -> export OBJ object -> import in second blender file -> export DAEits ok! it run now ^___^
:3 -
I worked the model, in a first blender file. then in another file (thanks Gaia) in another blender file I have the body & bones. To export the first model in the second blender file i use Dae, then import Dae in second blender file (file with body & bones), then rigg and export DAE (second time) to SL,,, mmm,,,,. I have the intuition to export twice in DAE could be the problem, I will first try to export firt model in OBJ -> import OBJ in file blender with body & bones -> and then export in DAE,,,
triying tests ^___^


 Facebook
 Instagram
 Twitter
 YouTube
 Flickr
i need upload a image
in Your Avatar
Posted